RealWorld App with Odoo OWL - Part 3 - Dynamic routing, willStart, willUpdateProps
 Philippe L'ATTENTION
We are now in the third part of our tutorial series about creating the RealWorld App (Demo link) and our current implementation in OWL is available here:
 Coding-Dodo
To continue directly where we left off last time, you can clone this branch:
git clone -b feature/authentication-registration https://github.com/Coding-Dodo/owl-realworld-app.gitOr continue with your own project, in this part, we will manage the Articles display, in the list and the single article page:
- Reactive component tightly coupled with data with the use of
willUpdateandwillUpdateProps. - Dynamic routing in the form of
/#/article/:slug.
The Article Component
We will begin by creating the first version of the Article Component because it is a pre-requisite of the ArticleList Component that we will build later. This Component will mainly be a "presentation" component, responsible for formatting some data and presenting it, the only real logic it will contain will be the "Like" button. But we will handle that later, for now, we will handle only the presentation layer.
We need to take a quick look at the Conduit API Specs to know how an article looks like when returned from API:
{
slug: "how-to-train-your-dragon",
title: "How to train your dragon",
description: "Ever wonder how?",
body: "It takes a Jacobian",
tagList: ["dragons", "training"],
createdAt: "2016-02-18T03:22:56.637Z",
updatedAt: "2016-02-18T03:48:35.824Z",
favorited: false,
favoritesCount: 0,
author: {
    username: "jake",
    bio: "I work at statefarm",
    image: "https://i.stack.imgur.com/xHWG8.jpg",
    following: false,
},
}
With that knowledge, we will create our ./src/components/Article.js to behave as if it was getting an article object as a prop and displaying its data.
import { Component, tags, router, hooks } from "@odoo/owl";
const { useGetters } = hooks;
const Link = router.Link;

const ARTICLE_TEMPLATE = tags.xml/*xml*/ `
<div class="article-preview">
    <div class="article-meta">
        <Link to="'PROFILE'"><img t-att-src="props.article.author.image" /></Link>
        <div class="info">
            <a href="" class="author"><t t-esc="props.article.author.username"/></a>
            <span class="date"><t t-esc="getArticleDate()"/></span>
        </div>
        <button class="btn btn-outline-primary btn-sm pull-xs-right">
            <em class="ion-heart"></em> <t t-esc="props.article.favoritesCount"/>
        </button>
    </div>
    <a href="" class="preview-link">
        <h1><t t-esc="props.article.title"/></h1>
        <p><t t-esc="props.article.description"/></p>
        <span>Read more...</span>
    </a>
</div>
`;
export class Article extends Component {
  static template = ARTICLE_TEMPLATE;
  static components = { Link };
  getters = useGetters();
  static props = {
    article: { type: Object },
  };
  getArticleDate() {
    let articleDate = new Date(this.props.article.createdAt);
    return articleDate.toLocaleDateString("en-US", {
      year: "numeric",
      month: "long",
      day: "numeric",
    });
  }
}
We added a function getArticleDate() that format the Date received from the API to the format expected by the others examples of RealWorld App. In this function, we use the native JavaScript Date object and transform it to the format needed by the specs of the FrontEnd.
With that done, let's tackle the creation of the ArticlesList.
The ArticlesList Component
New functions in our useApi custom hook
First, we will add 2 new API calls inside ./src/hooks/useApi.js to fetch articles.
  async getArticles(queryOptions) {
    let response = {};
    await this.service
      .get("/articles", { params: queryOptions })
      .then((res) => {
        if (res.data && res.data) {
          response = res.data;
        }
      })
      .catch((error) => {
        if (error && error.response) {
          response = error.response.data;
        }
      });
    return response;
  }
  async getArticlesFeed(queryOptions) {
    let response = {};
    await this.service
      .get("/articles/feed", { params: queryOptions })
      .then((res) => {
        if (res.data && res.data) {
          response = res.data;
        }
      })
      .catch((error) => {
        if (error && error.response) {
          response = error.response.data;
        }
      });
    return response;
  }
The getArticle function will take queryParameters as described by the API specs:
Query Parameters:
- Filter by tag:
?tag=AngularJS - Filter by author:
?author=jake - Favorited by user:
?favorited=jake - Limit number of articles (default is 20):
?limit=10 - Offset/skip number of articles (default is 0):
?offset=0
Imagining our Component via analysis of the API
The ArticlesList Component will be the container of the <Article> components, and will also be responsible for fetching and holding the data (list of articles).
The props
The ArticlesList will take different options as props that should reflect the API options to the articles endpoint to keep the logic simple. Reading the props of a current ArticlesList component should reflect the exact parameters request sent to the API.
- tag (string) prop to render an ArticleList filtered by tag
- author (string) prop to render an ArticleList filtered by author
- favorited (string) prop to render ArticleList filtered by "favorited by user=[USERNAME]"
- limit (number) prop to render ArticleList limit number of articles (default 20)
- offset (number)of the data being read from the API. The Component will then responsible for its pagination by keeping the same initials filters and updating its own props.
- feed (boolean) prop to render ArticleList via the /articles/feed endpoint. Only logged-in users, show articles list created by authors that user follow.
For example, the parent component Homepage will be responsible for the props passed to the ArticlesList Component.
The local state
Inside its local state, the ArticlesList component will hold:
- articles (Array) the list of article objects.
- articlesCount (Number) the total number of articles.
- loading (Boolean) state
- currentOffset (Number) that will be a copy of the passed props but saved to be passed itself to sub-component "Pagination".
Child Components
This Component will probably have 2 child Component:
- Multiple Article Components, each responsible for rendering a single article
- A Pagination Component to navigate through the records set.
Creating the ArticlesList Component, props validation and willStart hook.
Now that we know our props we can create our ./src/components/ArticlesList.js file
import { Component, tags, useState } from "@odoo/owl";
import { Article } from "./Article";

const ARTICLESLIST_TEMPLATE = tags.xml/*xml*/ `
<section>
    <span>Article count: <t t-esc="state.articlesCount"/></span>
    <span class="loading-articles" t-if="state.loading">
        Loading Articles...
    </span>
    <t t-foreach="state.articles" t-as="article">
        <Article article="article"/>
    </t>
    <span class="loading-articles" t-if="state.loading">
        Loading Articles...
    </span>
</section>
`;
export class ArticlesList extends Component {
  static template = ARTICLESLIST_TEMPLATE;
  static components = { Article };
  static props = {
    options: {
      type: Object,
      optional: true,
      tag: { type: String, optional: true },
      author: { type: String, optional: true },
      favorited: { type: String, optional: true },
      limit: { type: Number, optional: true },
      feed: { type: Boolean, optional: true },
      offset: { type: Number, optional: true },
    },
  };
}
Props validation
  static props = {
    options: {
      type: Object,
      optional: true,
      tag: { type: String, optional: true },
      author: { type: String, optional: true },
      favorited: { type: String, optional: true },
      limit: { type: Number, optional: true },
      feed: { type: Boolean, optional: true },
      offset: { type: Number, optional: true },
    },
  };
Leveraging props validation helps us and other developers of the team, to keep everything clean, and safer to use as our application grows in size.
props are required by default. You will not see any error in production mode but if you are in dev mode you will get an error if you omit any of the propsthat are not optional: ture.
Also if you are in dev mode and you pass the wrong kind of type for props it will trigger an error.
Handling state with willUpdateProps, willStart
The <ArticlesList> component is tightly coupled with the need to fetch articles from theAPI. Data needs to be present the first time the Component is rendering itself and each time the props are updated.
//imports ...
//template...
export class ArticlesList extends Component {
  static template = ARTICLESLIST_TEMPLATE;
  static components = { Article, Pagination };
  conduitApi = useApi();
  state = useState({
    articles: [],
    articlesCount: 0,
    loading: false,
  });
  static props = {
    queryOptions: {
      type: Object,
      optional: true,
      tag: { type: String, optional: true },
      author: { type: String, optional: true },
      favorited: { type: String, optional: true },
      limit: { type: Number, optional: true },
      feed: { type: Boolean, optional: true },
      offset: { type: Number, optional: true },
    },
  };
  conduitApi = useApi();

  async fetchArticles(queryOptions) {
    let response = {};
    Object.assign(this.state, { loading: true });
    if (queryOptions.feed == true) {
      response = await this.conduitApi.getArticlesFeed(queryOptions);
    } else {
      response = await this.conduitApi.getArticles(queryOptions);
    }
    Object.assign(this.state, response);
    Object.assign(this.state, { loading: false });
  }

  async willStart() {
    this.fetchArticles(this.props.queryOptions);
  }

  async willUpdateProps(nextProps) {
    if (deepEqual(nextProps.queryOptions, this.props.queryOptions)) {
      return;
    }
    this.fetchArticles(nextProps.queryOptions);
  }
First, we define our fetchArticles async function that will do the API call. This function will then be used in the next 2 functions:
willStart
This async function is the perfect spot to fetch data from an API, willStart will be called called just before the first rendering.
willUpdateProps(newProps)
This async function will be called after the props have changed. Here we will also call the API to fetch the articles again with new query parameters.
It will trigger if any change is made to the state of the Component passing the props so we will make a comparison of the old queryOptions with the new queryOptions. Since these are different objects we should do a deep comparison on the keys of the object. That's why we call deepEqual. On top of the file import the function:
import { deepEqual } from "../utils/utils.js";We will create a utils.js file inside ./utils/ folder with that content
function isObject(object) {
  return object != null && typeof object === "object";
}

export function deepEqual(object1, object2) {
  const keys1 = Object.keys(object1);
  const keys2 = Object.keys(object2);

  if (keys1.length !== keys2.length) {
    return false;
  }

  for (const key of keys1) {
    const val1 = object1[key];
    const val2 = object2[key];
    const areObjects = isObject(val1) && isObject(val2);
    if (
      (areObjects && !deepEqual(val1, val2)) ||
      (!areObjects && val1 !== val2)
    ) {
      return false;
    }
  }

  return true;
}
./utils/utils.js
Refactoring the Home Component and adding the ArticlesList
The Home Component can show different Article List via a Tabs system, specifically the Feed list, the Global list and, the filter by Tags list.
That means that the Home Component should hold in its state the current navigation mode it is on. Then create the config object to pass to <ArticlesList> Component.
First, we will refactor the useState() directive and put it inside the constructor of the component. This will help us to have the initial state of the component:
- If the user is logged in the current navigation mode by default is FEED
- If the user is not logged in the current navigation mode by default is GLOBAL
export class Home extends Component {
  static template = HOME_TEMPLATE;
  static components = { ArticlesList };
  getters = useGetters();

  constructor(...args) {
    super(...args);
    let initialNavMode = "GLOBAL";
    let initialArticlesOptions = { limit: 10, offset: 0 };
    if (this.getters.userLoggedIn()) {
      initialNavMode = "FEED";
      initialArticlesOptions = { feed: true, limit: 10, offset: 0 };
    }
    this.state = useState({
      text: "A place to share your knowledge.",
      navigationMode: initialNavMode,
      articlesOptions: initialArticlesOptions,
    });
  }
Inside the XML Template we also do some modifications:
- Pass our
state.articlesOptionsto theArticlesListComponent as props
<ArticlesList queryOptions="state.articlesOptions"/>Creating the Tabs system Feed/Global Feed/Tags inside our Home Component
Inside the Home component, we create a function to handle the change of navigation mode.
  changeNavigationMode(navigationMode, tag) {
    if (navigationMode == "FEED" && !this.getters.userLoggedIn()) {
      return;
    }
    let articlesOptions = {};
    switch (navigationMode) {
      case "FEED":
        articlesOptions = { feed: true, limit: 10, offset: 0 };
        break;
      case "TAGS":
        articlesOptions = { tag: tag, limit: 10, offset: 0 };
        break;
      default:
        articlesOptions = { limit: 10, offset: 0 };
    }
    Object.assign(this.state, {
      navigationMode: navigationMode,
      articlesOptions: articlesOptions,
    });
  }
./src/pages/Home.js
Calling that function will update the state of the Home Component to change the navigationMode and the articlesOptions (that is passed via props to the <ArticlesList/>).
Then we update the Template of the Home Component to make use of these new functions and states.
<div class="col-md-9">
    <div class="feed-toggle">
        <ul class="nav nav-pills outline-active">
            <li class="nav-item">
                <a  t-attf-class="nav-link {{ getters.userLoggedIn() ? '' : 'disabled' }} {{ state.navigationMode == 'FEED' ? 'active' : '' }}"
                    t-on-click.prevent="changeNavigationMode('FEED')"
                    href="/">
                    Your Feed
                </a>
            </li>
            <li class="nav-item">
                <a  t-attf-class="nav-link {{ state.navigationMode == 'GLOBAL' ? 'active' : '' }}"
                    t-on-click.prevent="changeNavigationMode('GLOBAL')"
                    href="/">
                    Global Feed
                </a>
            </li>
            <li class="nav-item" t-if="state.navigationMode == 'TAGS' and state.articlesOptions.tag">
                <a  t-attf-class="nav-link {{ state.navigationMode == 'TAGS' ? 'active' : '' }}"
                    href="#">
                    <i class="ion-pound"></i> <t t-esc="state.articlesOptions.tag"/>
                </a>
            </li>
        </ul>
    </div>
    <ArticlesList queryOptions="state.articlesOptions"/>
</div>
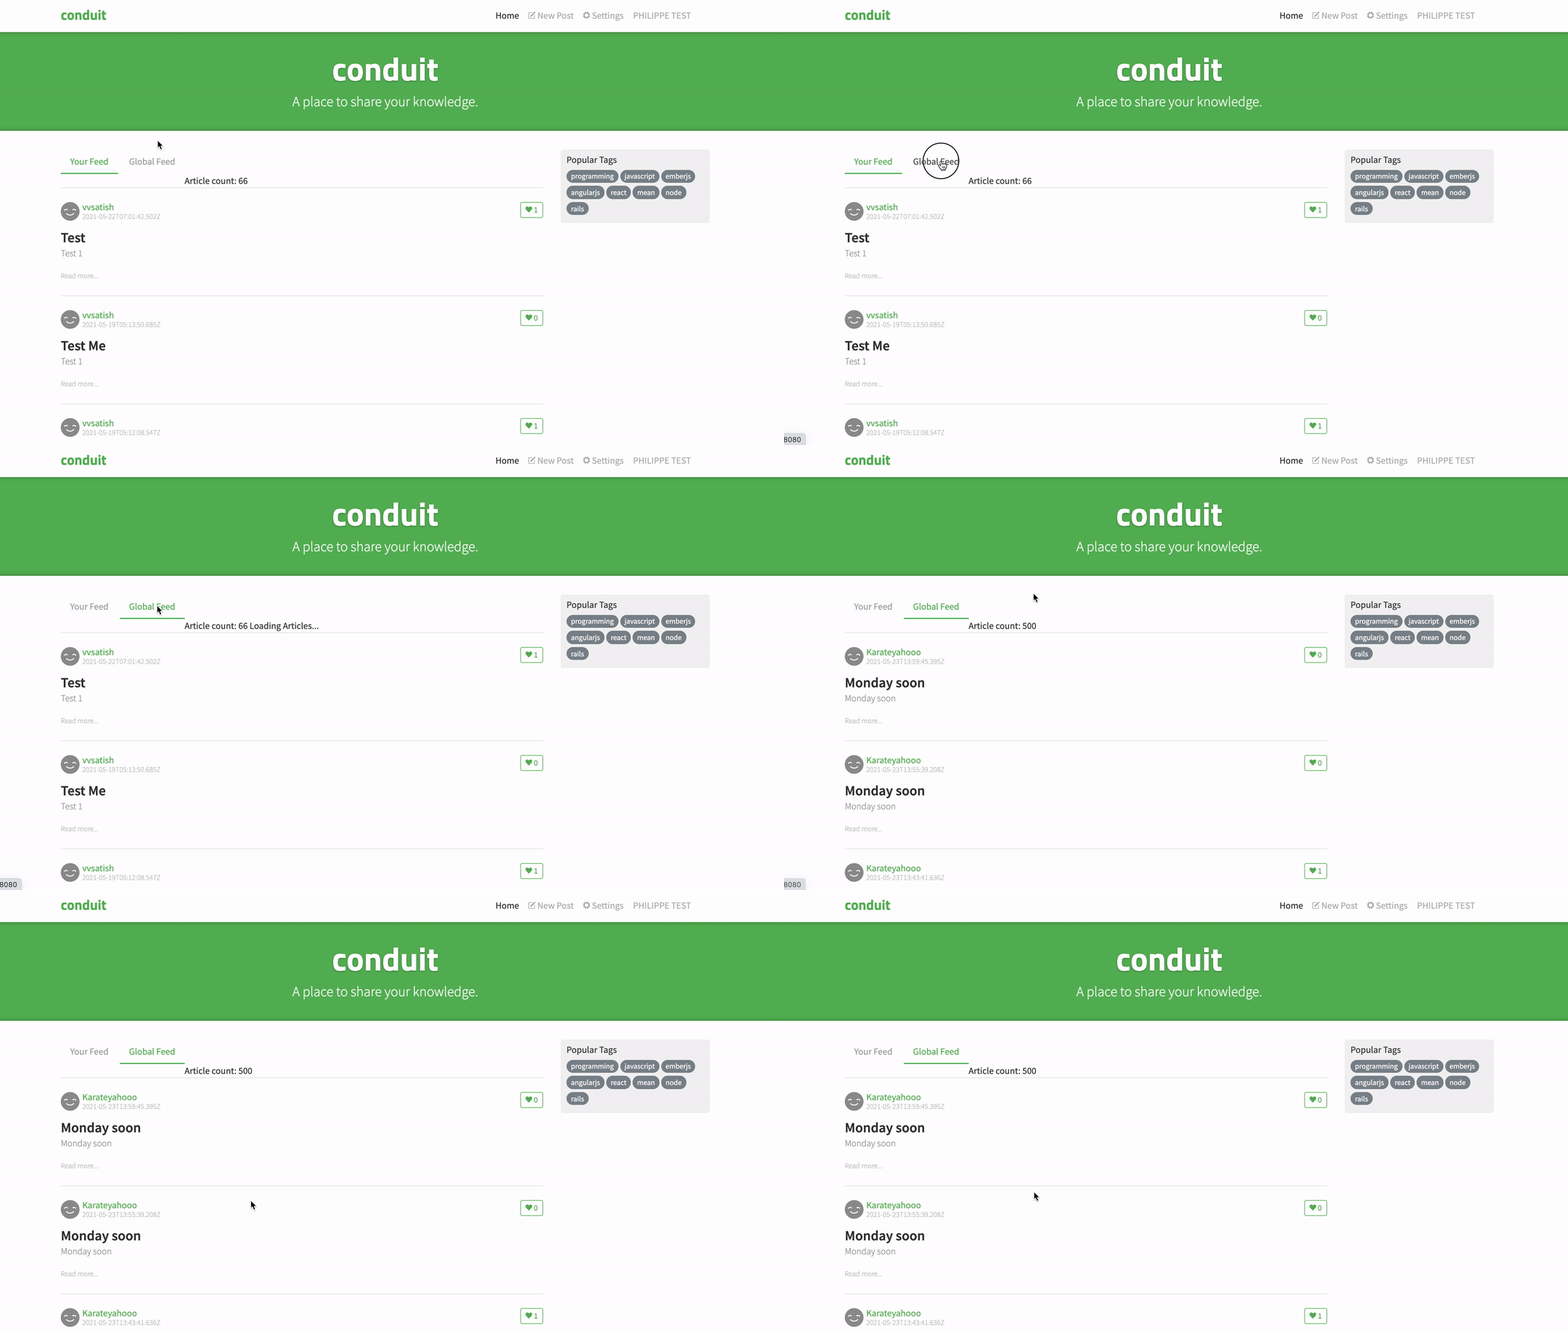
Now we have the Home component that will change its state navigation mode and the query parameters to the ArticlesList. From the articles list, we used the hook onWillUpdateProps to listen to the change of props and fetch again the articles from the API with these new params.
We don't have any Pagination yet be we can now test that our Home is working correctly and displaying articles.
Pagination: Emitting events from Child to Parent component
We will create a child component of the <ArticlesList/> that will handle pagination.
We learned from the beginning that data is supposed to go from Parent and passed as props to Children. The child component then handles their own state data and sometimes pass down some data as props to its own child.
In the case of the <Pagination/> component, it will get the current offset, the total number of items, and the items per page all passed as props. All of that will allow the component to do its calculation and generate the Pagination bar, and it will store in its own state the current page being watched.
The problem lays in the fact that the <ArticlesList/> should be aware of the change of page that happened inside the Pagination, to update its articlesOptions passed as props with a different offset and make a new API call.
Structure of the <Pagination/> Component
This component will mostly be a "presentation" component. Some inner maths functions will be required to have the currentPage and return the new offset but nothing that requires a state. All the necessary info is passed via props.
The Pagination algorithm itself is a basic one that creates a range of numbers with "..." to mark a big jump between numbers and avoid having all the 50 pages as links in our Pagination bar.
import { Component, tags } from "@odoo/owl";

const PAGINATION_TEMPLATE = tags.xml/*xml*/ `
<nav>
    <ul class="pagination">
        <t t-foreach="getPagination()" t-as="pageNumber">
            <li t-attf-class="page-item {{ pageNumber == getCurrentPage() ? 'active' : ''}}">
                <a class="page-link" href="" t-on-click.prevent="triggerPageChange(pageNumber)"><t t-esc="pageNumber"/></a>
            </li>
        </t>
    </ul>
</nav>
`;
export class Pagination extends Component {
  static template = PAGINATION_TEMPLATE;
  static props = {
    totalCount: { type: Number },
    currentOffset: { type: Number },
    itemsPerPage: { type: Number },
  };

  getCurrentPage() {
    return this.props.currentOffset / this.props.itemsPerPage + 1;
  }

  triggerPageChange(pageNumber) {
    if (pageNumber == "...") {
      return;
    }
    let offset = pageNumber * this.props.itemsPerPage - this.props.itemsPerPage;
    this.trigger("update-offset", {
      offset: offset,
    });
  }

  getPagination() {
    console.log("test");
    let m = parseInt(this.props.totalCount / this.props.itemsPerPage);
    let c = this.getCurrentPage();
    var delta = 2,
      range = [],
      rangeWithDots = [],
      l;
    range.push(1);
    for (let i = c - delta; i <= c + delta; i++) {
      if (i < m && i > 1) {
        range.push(i);
      }
    }
    range.push(m);
    for (let i of range) {
      if (l) {
        if (i - l === 2) {
          rangeWithDots.push(l + 1);
        } else if (i - l !== 1) {
          rangeWithDots.push("...");
        }
      }
      rangeWithDots.push(i);
      l = i;
    }

    return rangeWithDots;
  }
}
./src/components/Pagination.js
For now, in OWL we don't really have "computed properties" (like in Vue.js) and we need to calculate the currentPage based on the props, but that doesn't stop us, we created a simple function on the Component named getCurrentPage that gets used in others functions and also in the template.
On each link of the <ul/> we bind an event:
<a class="page-link" href="" t-on-click.prevent="triggerPageChange(pageNumber)">
    <t t-esc="pageNumber"/>
</a>
Notice that we put the modifier .prevent to the t-on-clink. This is a shortcut, instead of getting into the function and doing event.preventDefault().
  triggerPageChange(pageNumber) {
    if (pageNumber == "...") {
      return;
    }
    let offset = pageNumber * this.props.itemsPerPage - this.props.itemsPerPage;
    this.trigger("update-offset", {
      offset: offset,
    });
  }
In this function bound to the click, we re-calculate the new offset that the next query to the API should have and we trigger a custom event.
Emitting and Listening to custom events in OWL.
To emit an event from any component we have access to this.trigger('event-name', {data: data}). In this case, we fire an event called update-offset with data containing the offset calculated from the page number that was selected by the user.
Events are bubbled-up all way up the Componant hierarchy, we will not listen directly to it on the <ArticlesList/> component, because the articlesOptions is already passed as props from the <Home/> Component.
We will directly listen to the change inside the <Home/> component.
But from the Home component, we don't directly have access to the Pagination component! You will tell me. But this is not really a problem, the event is bubbled up from Pagination, then ArticlesList, so we can listen to it directly from Home binding it to the ArticlesList Component.
So Inside the ./pages/Home.js Component's Template:
<ArticlesList queryOptions="state.articlesOptions" t-on-update-offset="updateOffset"/>As you can see t-on-* can take custom event name and we bind it to this updateOffset function that will update Home articlesOptions state.
  updateOffset(ev) {
    let newArticlesOptions = {
      ...this.state.articlesOptions,
      offset: ev.detail.offset,
    };
    Object.assign(this.state, { articlesOptions: newArticlesOptions });
  }
Modifying its own state, and passing it to the ArticlesList componentwill trigger a willUpdateProps event, making it fetch new Articles with a new query option.
And passing the offset itself from ArticlesList as props to the Pagination component triggers a re-render of the Pagination component that will indicate the currentPage.
The Tags cloud Component
The <TagsCloud/> Component will be a child of the <Home/> page Component. As a child, it will need to emmit event so the Page Component can update its state and pass it as props to the <ArticlesList/>.
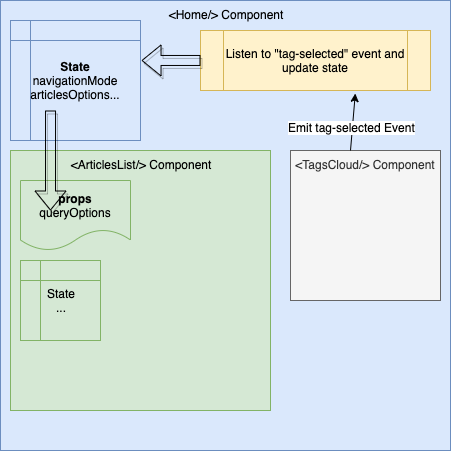
Click on Tag -> Emit event -> Home listen and update its state (navigation mode and query options) -> Home state is passed as props to ArticlesList -> ArticlesList props are updated -> ArticlesList re-render.
Let's create a file ./src/components/TagsCloud.js
import { Component, tags, useState, hooks } from "@odoo/owl";
const { onWillStart } = hooks;
import { useApi } from "../hooks/useApi";

const TAGS_CLOUD_TEMPLATE = tags.xml/*xml*/ `
<div class="col-md-3">
    <div class="sidebar">
        <p>Popular Tags</p>
        <div class="tag-list">
            <t t-foreach="state.tags" t-as="tag">
                <a href="#" class="tag-pill tag-default" t-on-click.prevent="tagSelected(tag)">
                    <t t-esc="tag"/>
                </a>
            </t>
        </div>
    </div>
</div>
`;
export class TagsCloud extends Component {
  static template = TAGS_CLOUD_TEMPLATE;
  state = useState({
    tags: [],
  });
  conduitApi = useApi();

  async fetchTags() {
    let response = await this.conduitApi.getTags();
    Object.assign(this.state, response);
  }

  async willStart() {
    this.fetchTags();
  }
  tagSelected(tag) {
    this.trigger("tag-selected", {
      tag: tag,
    });
  }
}
We use the willStart async function to make our API requests and populate the state. The template is quite simple, just a list of links with a t-on-click.prevent binding function that will trigger the "tag-selected" event.
Note that we don't make use of the loading state, it is here if you want to create feedback to the user in the template by adding CSS or a loading message.
Now, inside our ./src/pages/Home.js Component, we will import the class and insert it into the Template. We will listen to the custom "tag-selected" event and change navigation mode based on the event payload.
<TagsCloud t-on-tag-selected="onTagSelected"/>Inside the HOME_TEMPLATE
export class Home extends Component {
  static template = HOME_TEMPLATE;
  // ... rest of the code
  // ...
  onTagSelected(ev) {
    this.changeNavigationMode("TAGS", ev.detail.tag);
  }
}
And that's all, we already implemented our changeNavigationMode logic and the ArticlesList Component is also reactive to these changes. Good job!
Creating a dynamic route for the Article Page
In the first part we didn't create the Article page, nor did we create the route associated with it. This is a route with parameters and the final result should be /#/articles/:slug in the browser.
To do so, let's go back to the ./src/main.js file and add our new route:
export const ROUTES = [
  { name: "HOME", path: "/", component: Home },
  { name: "LOG_IN", path: "/login", component: LogIn },
  { name: "REGISTER", path: "/register", component: Register },
  {
    name: "SETTINGS",
    path: "/settings",
    component: Settings,
    beforeRouteEnter: authRoute,
  },
  {
    name: "EDITOR",
    path: "/editor",
    component: Editor,
    beforeRouteEnter: authRoute,
  },
  {
    name: "PROFILE",
    path: "/profile",
    component: Profile,
    beforeRouteEnter: authRoute,
  },
  {
    name: "ARTICLE",
    path: "/article/{{slug}}",
    component: ArticlePage,
  },
];
In the Code above, we associated the route to an ArticlePage Component that we didn't create yet, but will do shortly.
To make our route dynamic we have to put the parameter between curly braces, here it is path: "/article/{{slug}}",.
This parameter will then be available inside the router property env of the component we are in. For our example:
let slug = this.env.router.currentParams.slug;Posting the Article in Editor Component
We will edit our ./src/pages/Editor.js component to actually publish new articles.
Before editing the Component we must add the new API call inside our ./src/hooks/useApi.js
async createArticle(article) {
  let response = {};
  await this.service
    .post(`/articles`, {
      article: article,
    })
    .then((res) => {
      if (res.data && res.data) {
        response = res.data;
      }
    })
    .catch((error) => {
      if (error && error.response) {
        response = error.response.data;
      }
    });
  return response;
}
Now we edit the Editor Component
import { Component, tags, useState } from "@odoo/owl";
import { useApi } from "../hooks/useApi";
const { xml } = tags;

const EDITOR_TEMPLATE = xml/* xml */ `
<div class="editor-page">
  <div class="container page">
    <div class="row">

      <div class="col-md-10 offset-md-1 col-xs-12">
        <form>
          <fieldset>
            <fieldset class="form-group">
                <input type="text" class="form-control form-control-lg" placeholder="Article Title" t-model="state.title" t-att-disabled="state.publishingArticle"/>
            </fieldset>
            <fieldset class="form-group">
                <input type="text" class="form-control" placeholder="What's this article about?" t-model="state.description" t-att-disabled="state.publishingArticle"/>
            </fieldset>
            <fieldset class="form-group">
                <textarea class="form-control" rows="8" placeholder="Write your article (in markdown)" t-model="state.body" t-att-disabled="state.publishingArticle"></textarea>
            </fieldset>
            <fieldset class="form-group">
                <input type="text" class="form-control" placeholder="Enter tags" t-att-disabled="state.publishingArticle"/><div class="tag-list"></div>
            </fieldset>
            <button class="btn btn-lg pull-xs-right btn-primary" type="button" t-att-disabled="state.publishingArticle" t-on-click.prevent="publishArticle">
                Publish Article
            </button>
          </fieldset>
        </form>
      </div>

    </div>
  </div>
</div>
`;
export class Editor extends Component {
  static template = EDITOR_TEMPLATE;
  state = useState({
    title: "",
    description: "",
    body: "",
    tagList: [],
    publishingArticle: false,
  });
  conduitApi = useApi();
  async publishArticle() {
    if (!this.state.body || !this.state.title || !this.state.description) {
      return;
    }
    Object.assign(this.state, { publishingArticle: true });
    await this.conduitApi.createArticle(
      this.state.title,
      this.state.description,
      this.state.body
    );
    Object.assign(this.state, { publishingArticle: false });
    this.env.router.navigate({ to: "HOME" });
  }
}
The state contains all the fields necessary to create an Article and a publishingArticle state to give feedback to the user during API calls and prevent spamming.
Notice that all our inputs have the t-model attribute so they are bound to the state of our Component. The tagList is not bound, it requires some handling of user input to split the tags into an array, I will let you try and do it yourself.
To prevent spamming we added t-att-disabled="publishingArticle" to all of our inputs and the button. This way, the user cannot manipulate the form while we are posting against the API.
The rest of the Component is straightforward, we import our useApi hook and inside the publishArticle function we manipulate the publishingArticle state, call the API and finally redirect to the Home page.
This should sound familiar by now, feel free to improve it; handle errors, display them and don't redirect, handle the tagList.
The ArticlePage Component
First version draft of the Component
Inside ./src/pages/index.js export the ArticlePage Component:
import { LogIn } from "./LogIn";
import { Register } from "./Register";
import { Home } from "./Home";
import { Settings } from "./Settings";
import { Editor } from "./Editor";
import { Profile } from "./Profile";
import { ArticlePage } from "./ArticlePage";

export { LogIn, Register, Home, Settings, Editor, Profile, ArticlePage };
./src/pages/index.js
Don't forget to update the imports inside ./src/main.js, since we use the Component in the route binding:
import {
  LogIn,
  Register,
  Home,
  Settings,
  Editor,
  Profile,
  ArticlePage,
} from "./pages";
./src/main.js
Now, for the Component itself, create ./src/pages/ArticlePage.js:
import { Component, tags, useState, hooks } from "@odoo/owl";
const { onWillStart, useEnv } = hooks;
import { useApi } from "../hooks/useApi";

const ARTICLE_PAGE_TEMPLATE = tags.xml/* xml */ `
<div class="article-page">
<t t-if="state.article">
  <div class="banner">
    <div class="container">
      <h1 t-esc="state.article.title"></h1>
      <div class="article-meta">
        <a href=""><img t-att-src="state.article.author.image" /></a>
        <div class="info">
          <a href="#" class="author" t-esc="state.article.author.username"></a>
          <span class="date" t-esc="getArticleDate(state.article.createdAt)"></span>
        </div>
        <button t-attf-class="btn btn-sm {{ state.article.author.following ? 'btn-secondary' : 'btn-outline-secondary' }}">
          <i class="ion-plus-round"></i> <t t-esc="state.article.author.following ? 'Unfollow' : 'Follow'"/> <t t-esc="state.article.author.username"/>
        </button>
        <button t-attf-class="btn btn-sm {{ state.article.favorited ? 'btn-primary': 'btn-outline-primary' }}">
          <i class="ion-heart"></i> <t t-esc="state.article.favorited ? 'Unfavorite': 'Favorite'"/> Post
          <span class="counter">(<t t-esc="state.article.favoritesCount"/>)</span>
        </button>
      </div>
    </div>
  </div>
  <div class="container page">
    <div class="row article-content">
      <div class="col-md-12">
        <div t-raw="state.article.body"/>
      </div>
    </div>
    <hr />

    <div class="article-actions">
    <div class="article-meta">
        <a href=""><img t-att-src="state.article.author.image" /></a>
        <div class="info">
          <a href="#" class="author" t-esc="state.article.author.username"></a>
          <span class="date" t-esc="getArticleDate(state.article.createdAt)"></span>
        </div>
        <button t-attf-class="btn btn-sm {{ state.article.author.following ? 'btn-secondary' : 'btn-outline-secondary' }}">
          <i class="ion-plus-round"></i> <t t-esc="state.article.author.following ? 'Unfollow' : 'Follow'"/> <t t-esc="state.article.author.username"/>
        </button>
        <button t-attf-class="btn btn-sm {{ state.article.favorited ? 'btn-primary': 'btn-outline-primary' }}">
          <i class="ion-heart"></i> <t t-esc="state.article.favorited ? 'Unfavorite': 'Favorite'"/> Post
          <span class="counter">(<t t-esc="state.article.favoritesCount"/>)</span>
        </button>
      </div>
    </div>

    <!-- COMMENT SECTION -->
  </div>
</t>
</div>
`;
export class ArticlePage extends Component {
  static template = ARTICLE_PAGE_TEMPLATE;
  conduitApi = useApi();
  state = useState({
    article: {
      slug: "",
      title: "",
      description: "",
      body: "",
      tagList: [],
      createdAt: "",
      updatedAt: "",
      favorited: false,
      favoritesCount: 0,
      author: {
        username: "",
        bio: "",
        image: "",
        following: false,
      },
    },
  });
  async fetchArticle(slug) {
    let response = await this.conduitApi.getArticle(slug);
    if (response && response.article) {
      Object.assign(this.state, response);
    }
  }
  async willStart() {
    let slug = this.env.router.currentParams.slug;
    await this.fetchArticle(slug);
  }
  getArticleDate(date) {
    let articleDate = new Date(date);
    return articleDate.toLocaleDateString("en-US", {
      year: "numeric",
      month: "long",
      day: "numeric",
    });
  }
}
As with the precedent components we created, we use the willStart async function to load our data. Inside that function, we get the route parameter slug from env.router.currentParams and pass it to our request to get the desired article from the API.
Notice that this time we use await in front of our call to the fetchArticle function. This is partly here for learning purposes and partly due to the fact that our Article page is only interesting if the article is already fetched. By using await here the page wait for the query to end before rendering.
Remove the await and see the difference, the Component loads but the title, author, content of the articles are all empty for a moment (the duration of the request). I will let you decide which technique you prefer.
Adding a library to parse markdown into HTML
The body from the article object coming from the API is still in Markdown so we will use a library to parse it and output HTML.
For that, we will use marked as it's simple to use and widely adopted. CD into the root of your project and:
npm install markedThen inside the ArticlePage Component, we will import it
import { Component, tags, useState, hooks } from "@odoo/owl";
import { useApi } from "../hooks/useApi";
import marked from "marked";
In our template, we will call a function that will handle the render because calling directly marked from the template will not work (functions called has to be in the scope of the Component).
<div class="row article-content">
    <div class="col-md-12">
        <div t-raw="renderMarkdown(state.article.body)"/>
    </div>
</div>
And for the renderMarkdown function:
renderMarkdown(content) {
  return marked(content);
}
And voila!
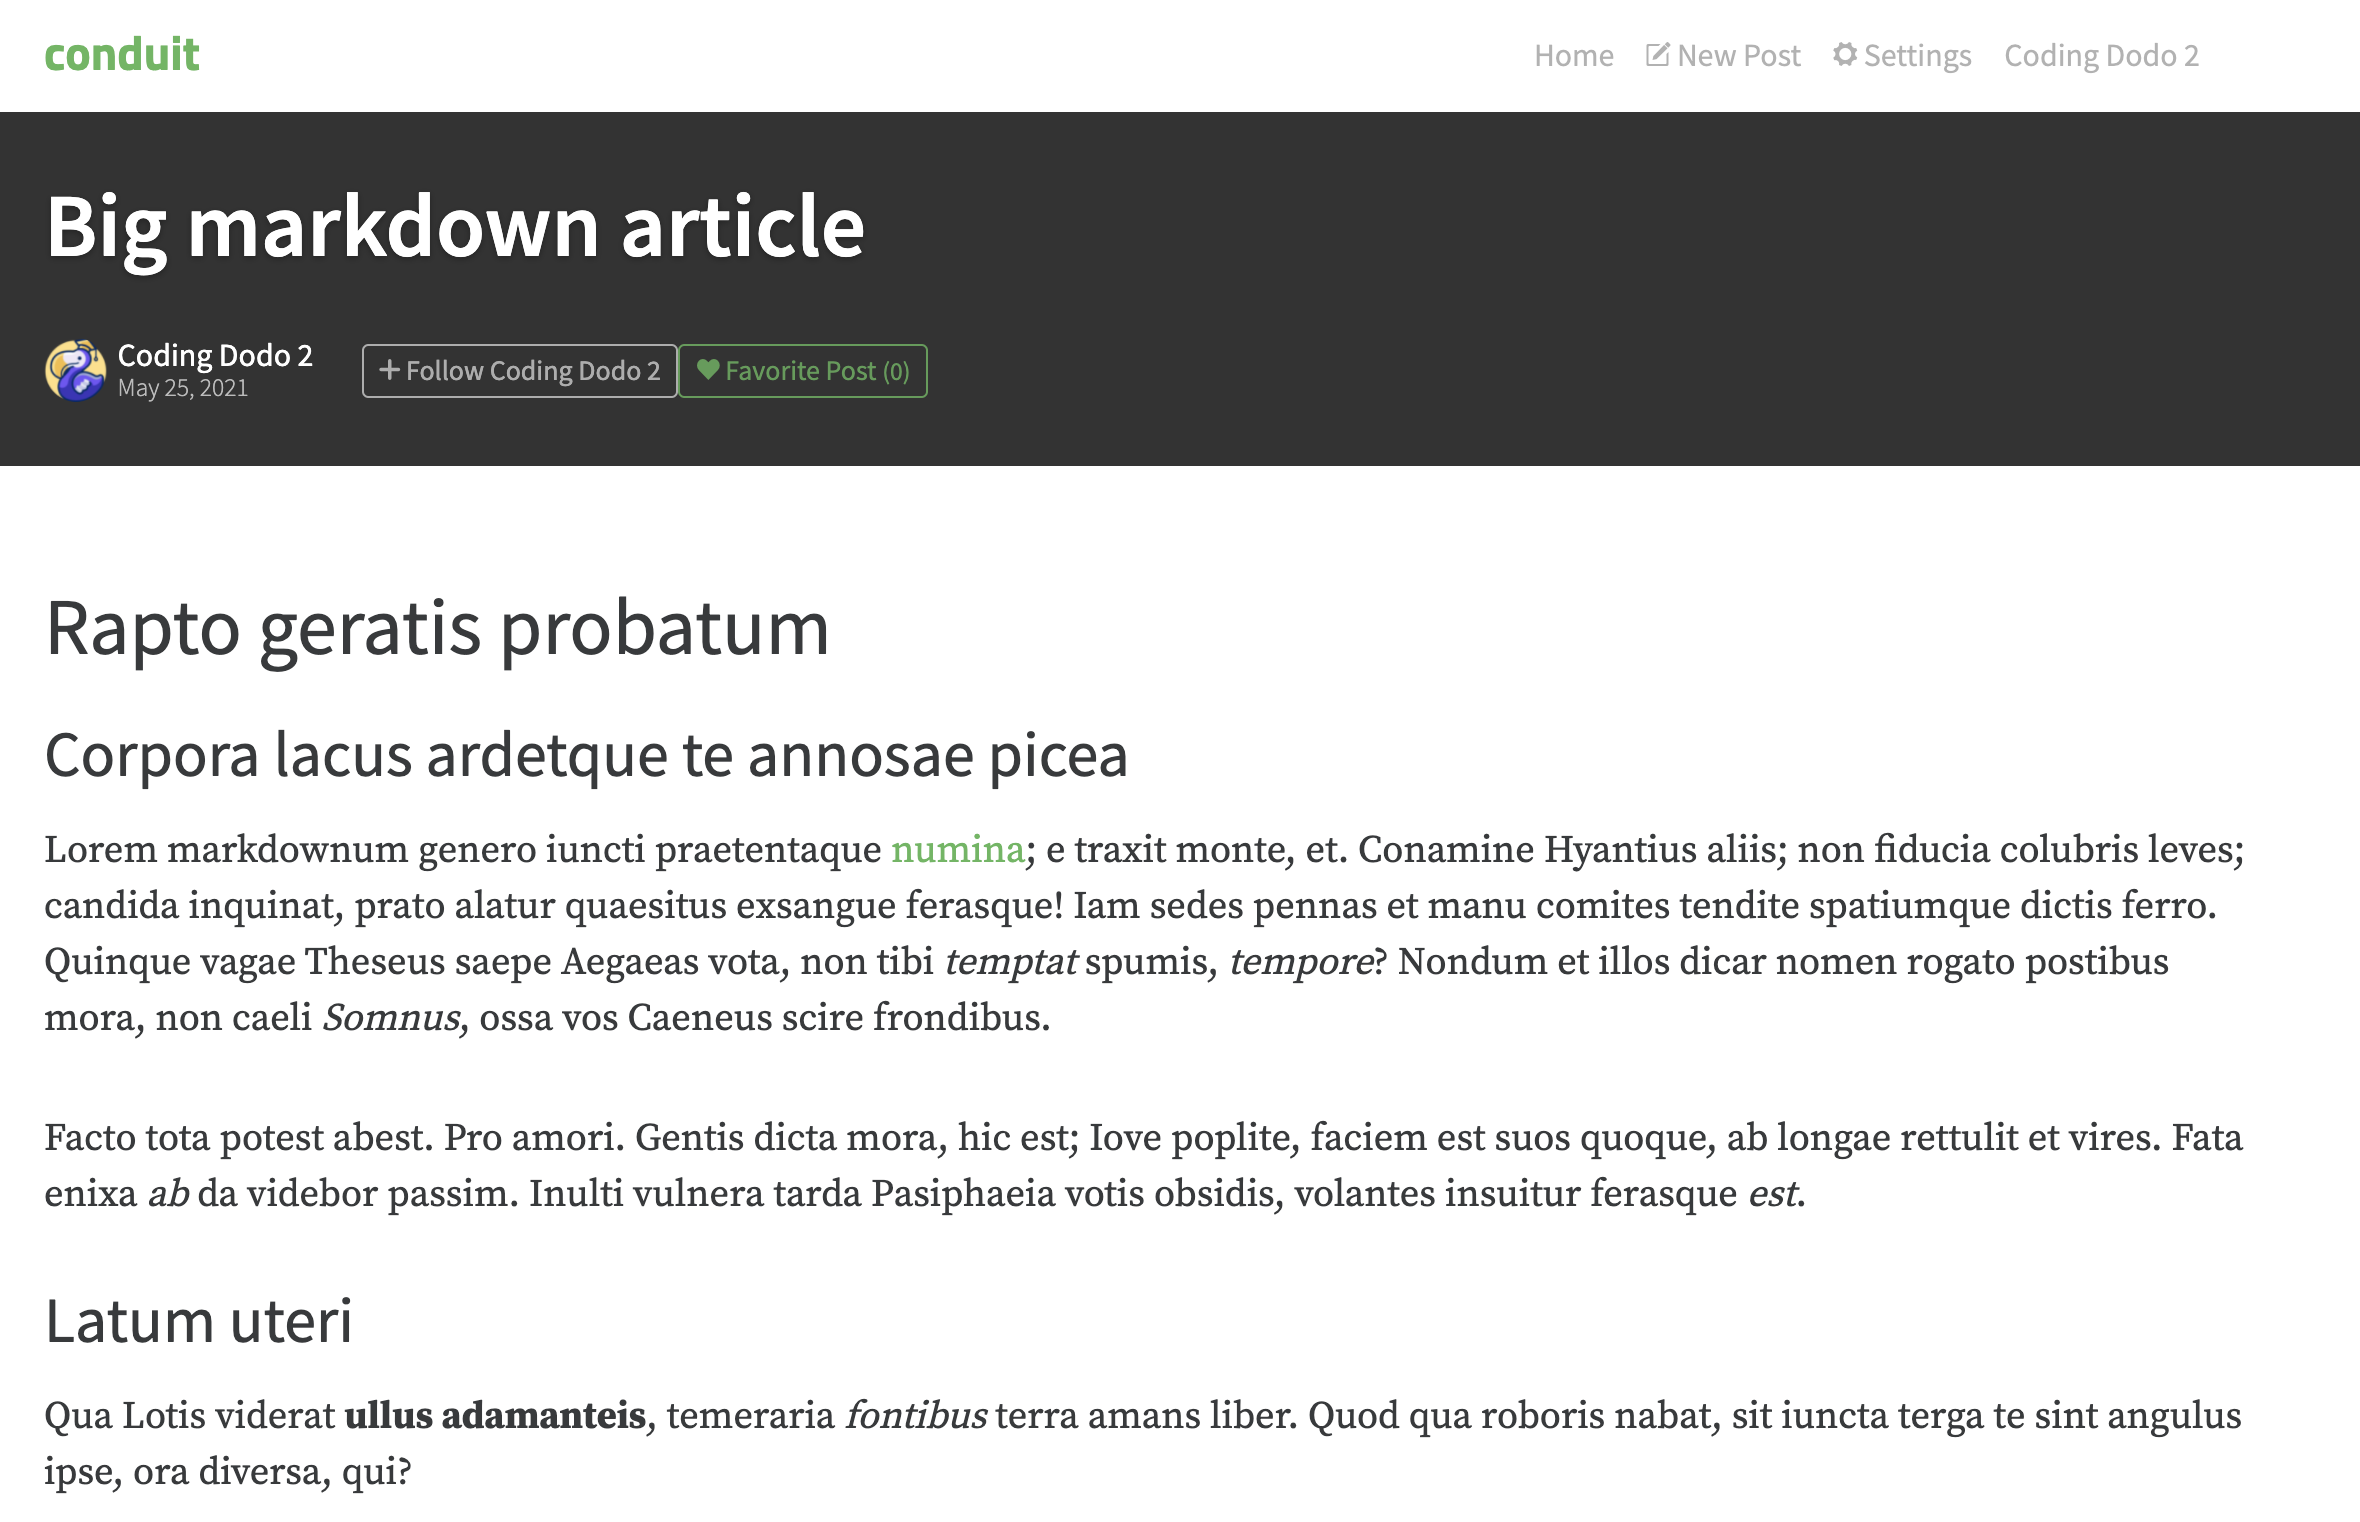
This part is already long enough, so I will let you continue the ArticlePage component.
Closing thoughts and follow up
In this tutorial we learned:
- How to emit custom events and listen to them in the parent Component.
- How to place data fetching code in
willStartandwillUpdatePropsasync function, so our Components are fully dynamic. - How to create a dynamic route and catching route parameters inside Components.
What to do next?
- Create an ArticleMeta Component, because the code displaying the Author and the follow/like button is duplicated on the ArticlePage. Add actions to add an article to favorite and follow the author only if the user is authenticated.
- Create the CommentsSection Component to display the comments of the article.
- Try to refactor and clean code with all this new knowledge! ArticleMeta is present in the Article component and, the ArticlePage component.
As always, the source code for this part of the tutorial is available here, but we learn by doing, so please consider trying to do the tasks listed above by yourself before looking at the solution ?.
To directly clone that branch (that part of the tutorial):
git clone -b feature/displaying-articles https://github.com/Coding-Dodo/owl-realworld-app.gitSeries Links
Part 1 - Basic Structure of the OWL Project and Components
Part 2 - Authentication, OWL Store
Part 3 (this one) - Dynamic Routing, and willStart functions.
Part 4 - Refactoring, and Hooks.