Odoo 15 is out, and with that comes a big rewrite of the WebClient, a new Odoo JavaScript module ES6-like system, registries, hooks, new Model, and the possibility to write new Views as OWL Component.
This article will go over some of the biggest additions, give a quick overview or full analysis, and some basic usage examples.
Odoo module ES6-like syntax
Odoo 15 introduced a new way of defining our JavaScript module instead of the usual odoo.define, we can now use a syntax similar to ES6 modules and import.
/** @odoo-module **/
import { someFunction } from './file_b';

// Your modules should always export something.
export function otherFunction(val) {
    return someFunction(val + 3);
}
The comment section /** @odoo-module **/ is essential for Odoo to understand that it will have to convert that module into old syntax after.
Be careful, this conversion is not done via Babel or any JavaScript transpiler. It's actually all happening a python file called odoo/odoo/tools/js_transpiler.py and can be quite fragile and with some caveats and limitations that are detailed here.
So, you shouldn't use more advanced ES6 Syntax or things like static class properties (not compatible with Safari or iOS), hoping that it will be converted.
Example
Let's say we have a file in coding_dodo_module/static/src/components/MyComponent.js with the new syntax:
/** @odoo-module **/
const { Component } = owl;

export class MyComponent extends Component {
  setup() {
	super.setup();
  }
}
Sometimes you will see export and other times, export default. If your module file contains multiple classes/functions use export for each of them. You may have to destructure to import what you want (import { FunctionTest, MyClass } from "my_package").
If your module file contains only one class/function use export default so it can be imported directly without destructuring.
How to import that file?
If you import from an old syntax module (with odoo.define and require)
const { MyComponent } = require("@coding_dodo_module/components/MyComponent");And if you import it from a new module syntax
import { MyComponent } from "@coding_dodo_module/components/MyComponent";Using aliases for a smoother transition
Let's say that you want to upgrade a file to the new odoo syntax but this file is imported in many other files like that:
const MyComponent = require("codingdodo_module.MyComponent");You don't want to change all the require yet, so you will have to alias your odoo-module and use export default like that to make the migration:
/** @odoo-module alias=codingdodo_module.MyComponent **/
const { Component } = owl;

export default class MyComponent extends Component {
  setup() {
	super.setup();
  }
}
With that syntax, you will not have to change any of the other imports/require in the other files.
The new Assets management
In Odoo 15 you have to declare your assets directly in the __manifest__.py file in the assets key grouped into bundles.
List of available bundles
This is a list of different bundles you can place your statics assets into:
'assets': {
    # -----------------------------
    # MAIN BUNDLES
    # -----------------------------
    'web.assets_qweb': [
    	# EXAMPLE: Add everyithing in the folder
        'web/static/src/**/*.xml',
        # EXAMPLE: Remove every .xml file
        ('remove', 'web/static/src/legacy/**/*.xml'),
    ],
    'web.assets_common_minimal': [
        # EXAMPLE lib
        'web/static/lib/es6-promise/es6-promise-polyfill.js',
    ],
    'web.assets_common': [
        # EXAMPLE Can include sub assets bundle
        ('include', 'web._assets_helpers'),
        'web/static/lib/bootstrap/scss/_variables.scss',
    ],
    'web.assets_common_lazy': [
		# ...
    ],
    'web.assets_backend': [
        # EXAMPLE Any files
        'web/static/src/core/**/*',
    ],
    "web.assets_backend_legacy_lazy": [
        # ...
    ],
    'web.assets_frontend_minimal': [
		# ...
    ],
    'web.assets_frontend': [
		# ...
    ],
    'web.assets_frontend_lazy': [
		# ...
    ],
    'web.assets_backend_prod_only': [
		# ...
    ],
    'web.report_assets_common': [
        # ...
    ],
    'web.report_assets_pdf': [
		# ...
    ],

    # --------------------------------
    # SUB BUNDLES
    # --------------------------------
    # These bundles can be used by main bundles but are not supposed to be
    # called directly from XML templates.
    #
    # Their naming conventions are similar to those of the main bundles,
    # with the addition of a prefixed underscore to reflect the "private"
    # aspect.
    #
    # Exemples:
    #   > web._assets_helpers = define assets needed in most main bundles

    'web._assets_primary_variables': [
		# ...
    ],
    'web._assets_secondary_variables': [
		# ...
    ],
    'web._assets_helpers': [
		# ...
    ],
    'web._assets_bootstrap': [
		# ...
    ],
    'web._assets_backend_helpers': [
		# ...
    ],
    'web._assets_frontend_helpers': [
        # ...
    ],
    'web._assets_common_styles': [
        # ...
    ],
    'web._assets_common_scripts': [
        #...
    ],

    # Used during the transition of the web architecture
    'web.frontend_legacy': [
        # ...
    ],

    # -----------------------------------
    # TESTS BUNDLES
    # -----------------------------------

    'web.assets_tests': [
        # ...
    ],
    'web.tests_assets': [
    	# ...
    ],
    'web.qunit_suite_tests': [
        # ...
    ],
    'web.qunit_mobile_suite_tests': [
		# ...
    ],
    # Used during the transition of the web architecture
    'web.frontend_legacy_tests': [
        # ...
    ],
},
Overview of the new WebClient
Before we begin creating our own View we need to take a look at the WebClient to understand where our custom View will fit in the grand scheme of things.
This is a schema of the whole architecture, everything on this drawing is a Component. If a Component is inside another, it means that it is one of its sub-Component.
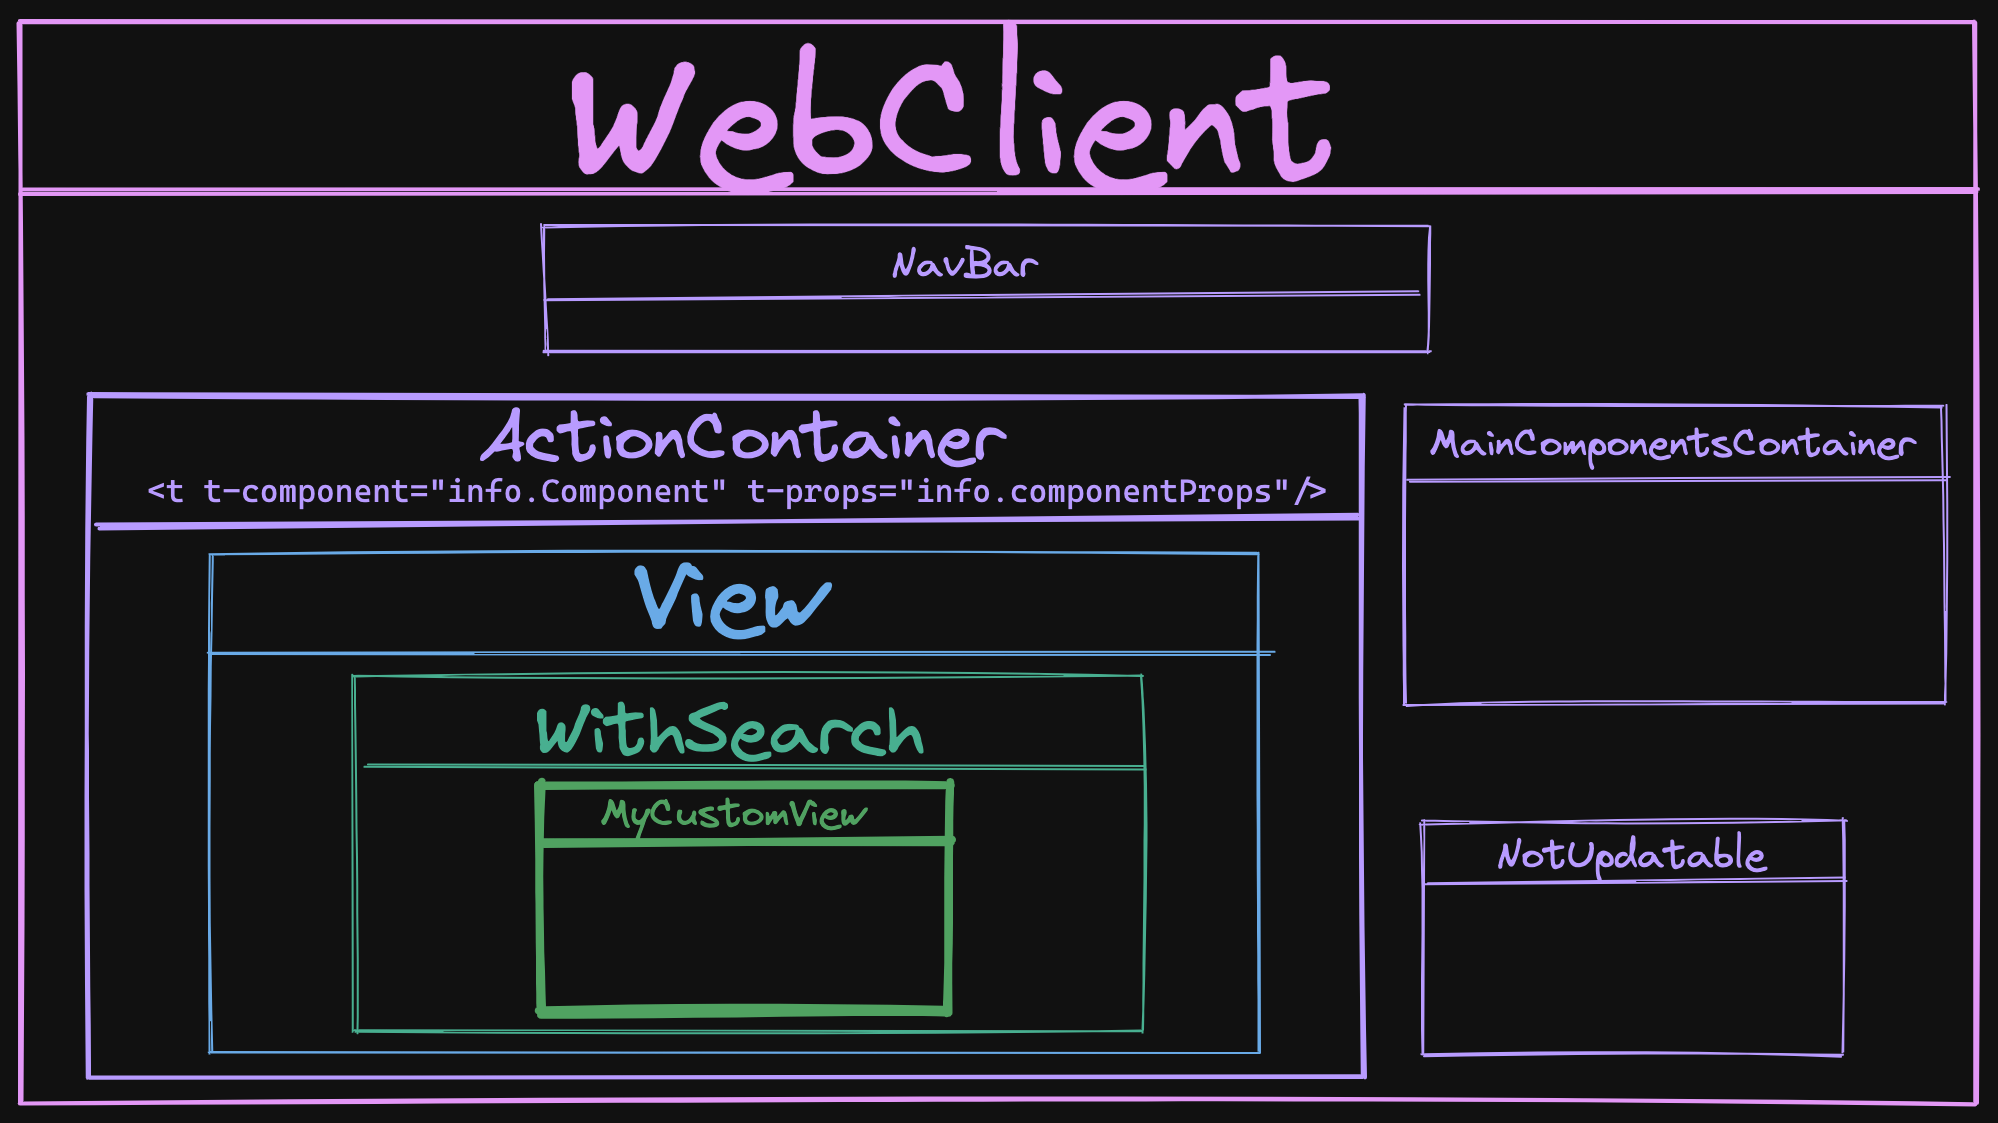
The WebClient Component
The WebClient is the main Component that is mounted onto the DOM <body> element via the startWebClient function:
const root = await mount(Webclient, { env, target: document.body, position: "self" });This WebClient has 4 sub-Components
WebClient.components = {
    ActionContainer,
    NavBar,
    NotUpdatable,
    MainComponentsContainer,
};NavBaris the navigation bar you see on top of your Screen in Odoo.NotUpdatableis a basic wrapper Component that overrides theshouldUpdatefunction to returnfalse. Basically creating a static Component.MainComponentsContaineris the container of the Component that is always here, like the Notification container, Dialog Container, etc...ActionContaineris the one that interests us the most.
The ActionContainer Component
The ActionContainer is a simple Component that reacts to the actionService an especially on the ACTION_MANAGER:UPDATE event.
export class ActionContainer extends Component {
    setup() {
        this.info = {};
        this.env.bus.on("ACTION_MANAGER:UPDATE", this, (info) => {
            this.info = info;
            this.render();
        });
    }

    destroy() {
        this.env.bus.off("ACTION_MANAGER:UPDATE", this);
        super.destroy();
    }
}
This event is fired when a new action has been made and the View needs to be replaced for example.
The info given by the action manager contains the ControllerComponent that and the ComponentProps that will be passed to that dynamic Component from the ControllerComponent.
But why the ControllerComponent isn't on the Schema?
Actually, the ControllerComponent is only here to manage Legacy Views that still need a Controller. It doesn't even have its own class and is declared inline inside a function, it really is just a proxy to check:
- If it is a legacy view, it will give an old MVC Style Controller
- If it is an OWL View it will directly give the View Component.
The View Component
In the case we are creating an OWL View (an in future v 16) the View Component is given, defined in odoo/addons/web/static/src/views/view.js
export class View extends Component {
    setup() {
        const { arch, fields, resModel, searchViewArch, searchViewFields, type } = this.props;
        // ...
    }
    async willStart() {
        let ViewClass = viewRegistry.get(this.props.type);
        // ...
        // ...
        // Defining the props of the withSearch Component
        this.withSearchProps = {
        ...this.props,
           Component: ViewClass, // This is our ACTUAL VIEW
           componentProps: viewProps,
        };
    //...
    }
}
View.template = "web.View";
View.components = { WithSearch };
As you can see this View Component create the props for the WithSearch Component that will contain the real custom View we created.
The WithSearch Component
Finally, located in odoo/addons/web/static/src/search/with_search/with_search.js, the WithSearch Component is the last step before our custom view.
Its main function is to attach a SearchModel to the env of our custom View, handle the search bar by creating config for the ControlPanel and SearchPanel.
Nothing is displayed by this Component, it is purely made to manage data that will be passed to sub-components, as we can see on its template:
<t t-name="web.WithSearch" owl="1">
    <t t-component="Component" t-props="componentProps" />
</t>
Now that we have this overview of the WebClient for an OWL View, we can continue our Reference guide about the different parts you will use in creating your own OWL View.
The Layout Component
This is a new helper Component that will be used when you are creating new OWL Views from scratch. This Layout is the one responsible for the presence of the:
- SearchPanel
- ControlPanel
- Banner
Usage
You have to import the Component and register it inside the components of your own View.
import { Layout } from "@web/views/layout";

class OWLTreeView extends owl.Component {
  static type = "owl_tree";
  static display_name = "Hierarchichal Tree View";
  static icon = "fa-list-ul";
  static multiRecord = true;
  static components = { Layout };
  // ...
The Layout Component will most of the time, be your "wrapper" Component, around the actual OWL View content. You will include it in your OWL View template like that:
<Layout viewType="'my_super_view'" useSampleModel="model.useSampleModel">
    <div>The content of my view</div>
</Layout>
How does it work?
The Layout Component is defined in odoo/addons/web/static/src/views/layout.js and is a very simple one:
/** @odoo-module **/

import { ControlPanel } from "@web/search/control_panel/control_panel";
import { SearchPanel } from "@web/search/search_panel/search_panel";

const { Component } = owl;

/**
 * @param {Object} params
 * @returns {Object}
 */
export const extractLayoutComponents = (params) => {
    return {
        ControlPanel: params.ControlPanel || ControlPanel,
        SearchPanel: params.SearchPanel || SearchPanel,
        Banner: params.Banner || false,
    };
};

export class Layout extends Component {
    setup() {
        const { display = {} } = this.env.searchModel || {};
        this.components = extractLayoutComponents(this.env.config);
        this.display = display;
    }
}

Layout.template = "web.Layout";
Layout.props = {
    viewType: { type: String, optional: true },
    useSampleModel: { type: Boolean, optional: true },
};
With this template:
<t t-name="web.Layout" owl="1">
    <div t-att-class="{ o_view_sample_data: props.useSampleModel }" t-attf-class="{{ props.viewType ? `o_${props.viewType}_view` : '' }}">
        <t t-component="components.ControlPanel" t-if="display.controlPanel">
            <!-- Empty body to assign slot id to control panel -->
        </t>
        <div class="o_content" t-att-class="{ o_component_with_search_panel: display.searchPanel }">
            <t t-component="components.Banner" t-if="components.Banner and display.banner" />
            <t t-component="components.SearchPanel" t-if="display.searchPanel" />
            <t t-slot="default" />
        </div>
    </div>
</t>
So this component is the one adding the ControlPanel, the Banner, and the SearchPanel to your view. If you don't use them in your View you will not get these 3 components unless you add them yourself.
As you can see from the source code, the Layout Component makes some checks to display or not the different sub-Component, let's see how to customize that.
Layout: Display or Hide the ControlPanel, SearchPanel, Banner
The customization will happen inside the setup function of your Component, we will create a subEnv and modify the searchModel key:
/** @odoo-module **/
import { Layout } from "@web/views/layout";
const { useSubEnv } = owl.hooks;

class MyComponent extends owl.Component {
  setup() {
    let searchModel = this.env.searchModel;
	searchModel.display = {
	  controlPanel: false,
	  searchPanel: true,
    };
    useSubEnv({searchModel: searchModel});
  }
}
MyComponent.components = { Layout };
This is an example result:
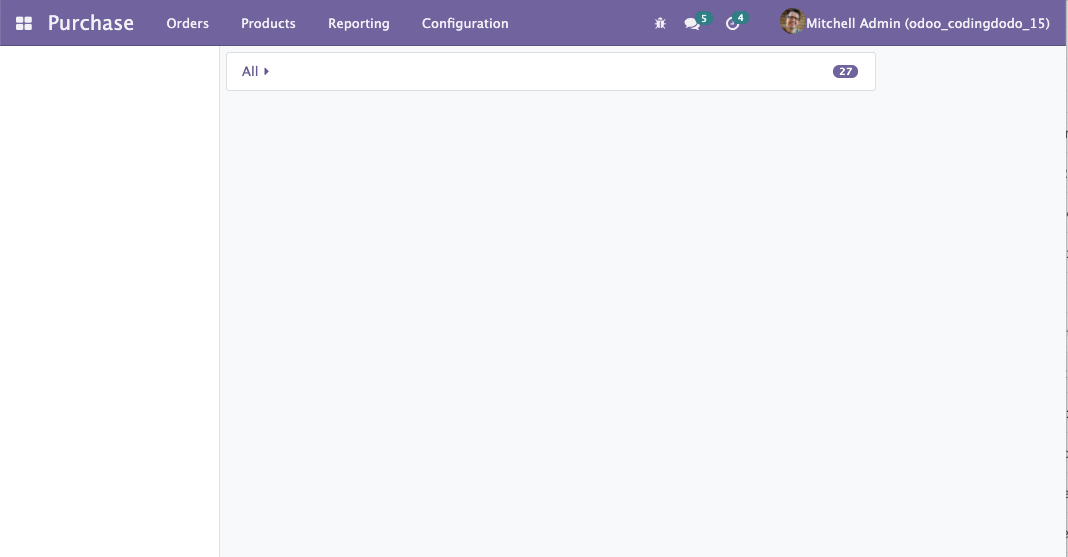
The searchPanel is on the left and the ControlPanel disappeared!
Using custom SearchPanel, ControlPanel, Banner components
You can actually switch Components used inside the layout:
/** @odoo-module **/
import { Layout } from "@web/views/layout";
const { useSubEnv } = owl.hooks;

class DummyControlPanel extends owl.Component {}
DummyControlPanel.template = owl.tags.xml/* xml */ `
<div>DummyControlPanel</div>`;

class MyBanner extends owl.Component {}
MyBanner.template = owl.tags.xml/* xml */ `
<div class="banner-test"><h1>HELLO BANNER</h1></div>`;


class MyComponent extends owl.Component {
  setup() {
    let config = this.env.config;
    let searchModel = this.env.searchModel;
    // Replacing the ControlPanel
    config.ControlPanel = DummyControlPanel;
    // Adding a Banner Component, default is not defined
    config.Banner = MyBanner;
    config.bannerRoute = "/toy/banner/route";
    // Handling display
    searchModel.display = {
      controlPanel: true,
      banner: true,
    };
    useSubEnv({
      searchModel: searchModel,
      config: { ...config },
    });
  }
}
MyComponent.components = { Layout };
Example result
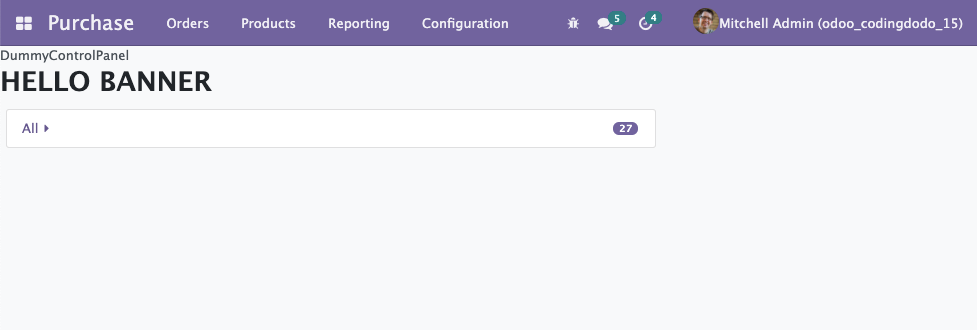
That's it for the Layout Component, very helpful to create new OWL Views.
The new Model Class
Located in odoo/addons/web/static/src/views/helpers/model.js, the new Model class is used when creating new Views. You can see some actual implementation examples for the Graph and Pivot Views. You can also check out our own View we created to have an example.
This Model Class is a bit different than the old JavaScript MVC system.
/** @odoo-module **/
import { Model } from "@web/views/helpers/model";

export class MyAwesomeModel extends Model {

  setup(params, { orm }) {
    this.modelName = params.resModel;
    this.orm = orm;
  }

  async load(params) {
      // ...
  }
}
Reactivity is achieved via the notify function.
First, it inherits the EventBus Class (coming directly from the owl library) and this is how it will handle reactivity, by using the trigger function (inherited from EventBus) via the notify function:
export class Model extends EventBus {
    // ... rest of the class skipped
    notify() {
        this.trigger("update");
    }
    // ...
}The trigger will fire an update event that will be caught by the useModel hook (see below). This useModel hook has access to the Component it is composing and will call a "render" on that Component.
notify() from one of your Model function, it will re-render the Component that is using this Model.Basic example
import { Model } from "@web/views/helpers/model";

export class MyAwesomeModel extends Model {

  setup(params, { orm }) {
    this.model = params.resModel;
    this.columns = params.columns;
    this.orm = orm;
    this.keepLast = new KeepLast();
  }

  async load(params) {
    const fields = this.columns.map((col) => col.name);
    this.data = await this.keepLast.add(
      this.orm.searchRead(this.model, params.domain, fields)
    );
    this.notify();
  }
}
MyAwesomeModel.services = ["orm"];
The Model.services property
When you declare your Model, don't forget to add the services you want to use. Often, you will see that we add the "orm" service:
export class MyAwesomeModel extends Model {
    // "orm" is injected as a dependency
    setup(params, { orm }) {
        this.orm = orm;
    }
// Register "orm" as a service
MyAwesomeModel.services = ["orm"];
Notice that, in the setup you have to declare orm since you are going to use it. Now to understand when and where does the string "orm" convert to the full "ORM Service" we have to check the useModel hook.
In itself, the new Model class doesn't do much, but with the power of the useModel hook it creates reactivity, let's check that.
The useModel hook
The basic setup of a View instantiate a Model with the useModel hook, then passes it to the Renderer Component.
With this magic hook, the Component using it becomes aware of the change made on the Model and re-renders itself as an answer.
How it works
The hook is located in odoo/addons/web/static/src/views/helpers/model.js, the function is quite long so i will just extract some of the most interesting pieces.
The useService calls
The services array that you registered (see previous section) are instantiated here:
const services = {};
for (const key of ModelClass.services) {
    services[key] = useService(key);
}
services.orm = services.orm || useService("orm");BTW, notice that even if you don't declare "orm" it will be added by default.
Instantiating the Model
To instantiate the useModel it you have to give the Model instance and the params that will also be passed to instantiate the Model:
export function useModel(ModelClass, params, options = {}) {
    // ...
    const model = new ModelClass(component.env, params, services);
    //...
}
Reactivity: Listening to the notify from the Model to re-render
With the following lines, the Component using this hook will render itself again, when the update event is coming from the Bus:
useBus(model, "update", options.onUpdate || component.render);Remember that the new Model class notify function actually just fire an 'update' event.
Reactivity: Loading the Model with onWillStart and onWillUpdateProps
This hook uses other hooks itself to handle reactivity. It is very similar to what we did in our Tutorial Series about creating the RealWorld App. So take a look if you don't understand the following piece:
async function load(props) {
    model.orm = orm;
    const searchParams = getSearchParams(props);
    await model.load(searchParams);
    if (useSampleModel && !model.hasData()) {
        sampleORM =
            sampleORM || buildSampleORM(component.props.resModel, component.props.fields, user);
        model.orm = sampleORM;
        await model.load(searchParams);
    } else {
        useSampleModel = false;
    }
    model.useSampleModel = useSampleModel;
}
onWillStart(() => {
    return load(component.props);
});
onWillUpdateProps((nextProps) => {
    useSampleModel = false;
    return load(nextProps);
});Usage
/** @odoo-module **/
import { useModel } from "@web/views/helpers/model";
import MyCustomModel from "@my_module/my_custom_model";

class CustomView extends owl.Component {
  /**
   * Standard setup function of OWL Component, here we
   * instantiate the Model.
   **/
  setup() {
    this.model = useModel(MyCustomModel, {
      resModel: this.props.resModel,
      domain: this.props.domain,
    });
  }
The model will hold data, so you can pass it directly as a prop to a Renderer. This way, when the data changes, the Renderer will update itself.
Registries
Registries have been refactored, improved, and expanded in Odoo v15. They are a good extension point for your own code. Registries are classified by categories and you can get or add to them very easily.
Overview
import { registry } from "@web/core/registry";


// Example VIEWS Category to add a View
const viewRegistry = registry.category("views");
viewRegistry.add("owl_tree", OWLTreeView);

// Example MAIN COMPONENTS Category to add a Root Component
registry.category("main_components").add("DialogContainer", {
    Component: DialogContainer,
    props: { bus, dialogs },
});

// Example DEBUG Category sub category
registry.category("debug").category("form").add("...", MyClass)

// Example SERVICES Category from partner_autocomplete module
export const companyAutocompleteService = {
    // Dependency Injection system
    dependencies: ["orm", "company"],

    start(env, { orm, company }) {
        if (session.iap_company_enrich) {
            const currentCompanyId = company.currentCompany.id;
            orm.silent.call("res.company", "iap_enrich_auto", [currentCompanyId], {});
        }
    },
};

registry
    .category("services")
    .add("partner_autocomplete.companyAutocomplete", companyAutocompleteService);
The most interesting ones for regular development are:
viewscategory for you to add new OWL Viewsmain_componentsto add Components accessible at the root level, like Dialog, Chat windows, Notification containerservicescategory that will contain very useful, well, services, like ORM, RPC, session, storage, etc
The Service registry and useService hook
Architecture of a Service object
This is the basic architecture of a Service
/** @odoo-module **/
import { registry } from "@web/core/registry";
export const myCustomService = {
  dependencies: ["user"],
  async: ["isAdmin"],
  // 'user' dependency injected
  start(env, { user }) {
    // closure declaration
    // This same "count" will live and be incremented
    // from anywhere in the application where this
    // service is called
    let count = 0;
    return {
      isAdmin() {
        return user.hasGroup("base.group_system");
      },
      incrementCounter() {
        count++;
      },
      getCount() {
        return count;
      },
    };
  },
};
// Registering the service
registry.category("services").add("my.custom.service", myCustomService);
A service is an Object with 2 keys at a minimum:
dependencies: here you register other services that yours will depend upon.startfunction: the body of your service. Takesenvas a first parameter, then the injected dependencies that you declared.
You can see here the async key is also available. You can directly define your functions inside the start as async or you can define which one is asynchronous inside this async array.
Usage with useService hook
This hook is located in "odoo/addons/web/static/src/core/utils/hooks.js" and will return the adequate Service, with dependencies injected, coming directly from the SERVICES_METADATA. This SERVICES_METADATA is a big object containing all the registered services instantiated and ready to be used (all functions from the start function merged and exposed).
Be careful, calling this service directly like registry.category("services").get('my.custom.service') would not work. You have to use the useService hook for that:
const customService = useService("my.custom.service");
customService.incrementCounter();
console.log(customService.getCount());
We will now take a look at one example Service.
The Action Service
The action service is located in odoo/addons/web/static/src/webclient/actions/action_service.js and contains all the "actions-related" functions, the service category is aptly named "action".
There is a lot of functions in this file but the usable API return by the service is this one (these are the functions you have access to):
return {
    doAction,
    doActionButton,
    switchView,
    restore,
    loadState,
    async loadAction(actionRequest, context) {
        let action = await _loadAction(actionRequest, context);
        return _preprocessAction(action, context);
    },
    get currentController() {
        return _getCurrentController();
    },
    __legacy__isActionInStack(actionId) {
        return controllerStack.find((c) => c.action.jsId === actionId);
    },
};doAction, call an action given an action name or a params objectdoActionButton, call action of type "object"switchView, given the name of the view type and the params, switch to the controller of that viewrestore, given the JavaScript ID of a controller, restore the view to that Controller. If null is given, restore to the last controller on the stack.loadState: Performs adoActionor aswitchViewaccording to the current content of the URL
Example usage in your Views
If your view needs to do things like doAction or switchView you will need to give it access to this service, via the useService('action') declaration.
/** @odoo-module **/

import { useService } from "@web/core/utils/hooks";
const { Component } = owl;

export class MyViewComponent extends Component {
    setup() {
        this.actionService = useService("action");
    }
}
Example usage for doAction
Similar to the old doAction, if you want to open any action, for example from the project module:
this.actionService.doAction("project.project_update_all_action", {
    additionalContext: {
        default_project_id: this.projectId,
        active_id: this.projectId,
    },
});
Can also be called without the action name as the first argument:
this.actionService.doAction(
    {
        context,
        domain,
        name: title,
        res_model: resModel,
        target: "current",
        type: "ir.actions.act_window",
        views: actionViews,
    },
    {
        viewType: "list",
    }
);
Example usage doActionButton
Expected params for the function:
this.actionService.doActionButton({
    args: {},
    buttonContext: {},
    context: {},
    close: null,
    resModel: "",
    name: payload.action_data.name,
    resId: ID || null,
    resIds: [Ids],
    special: false,
    type: 'button',
    onClose: callBack,
    effect: null,
}),
Example usage for switchView
If you have the target res.model and want to open the record:
const resIds = this.model.data.map((record) => record.id);
this.actionService.switchView("form", { resId: record.id, resIds });
The ORM and the RPC services
The rpc Service
In odoo 15 the RPC service is still here, but it is now part of the new services registry.
import { useService } from "@web/core/utils/hooks";

// ...
const rpcService = useService("rpc");
let products = await rpcService({
  model: 'product.product',
  method: 'search_read',
  kwargs: {
    'domain': [],
    'fields': ['id', 'name'],
    'offset': 0,
    'limit': 10
  },
  //context: {},
});
Nothing changed here really, except the useService hook.
The orm Service.
Located in odoo/addons/web/static/src/core/orm_service.js, the ORM service is an abstraction layer on top of the rpc service that is specially made to make RPC calls targeted at Models. Its goal is to have an API very similar to what we have in the backend.
This is the API:
import { useService } from "@web/core/utils/hooks";

// ...
// Example
const ormService = useService("orm");

ormService.create(model, state, ctx);
ormService.read(model, ids, fields, ctx);
ormService.readGroup(model, domain, fields, groupby, options = {}, ctx = {});
ormService.search(model, domain, options = {}, ctx = {});
ormService.searchRead(model, domain, fields, options = {}, ctx = {});
ormService.write(model, ids, data, ctx);
ormService.unlink(model, ids, ctx);

ormService.webReadGroup(model, domain, fields, groupby, options = {}, ctx = {});
ormService.webSearchRead(model, domain, fields, options = {}, ctx = {});
These are all asynchronous calls, so in a real example you would use the await keyword, inside an async function.
Usage example
Inside a new Model class, where this.orm service was injected:
/** @odoo-module **/
import { Model } from "@web/views/helpers/model";

export default class CustomModel extends Model {
  setup(params, { orm }) {
    this.modelName = params.resModel;
    this.orm = orm;
  }
  async getSomeData(params) {
    this.orm.searchRead(this.model, params.domain, [], { limit: 10 })
    this.notify();
  }
}
CustomModel.services = ["orm"];
Finally, how to create an OWL View
As I implied at the beginning of our analysis, in Odoo 15 you can create a new View type without inheriting from the old MVC Classes.
The main View class will be an OWL Component and the Controller is not necessary anymore.
Basic View definition
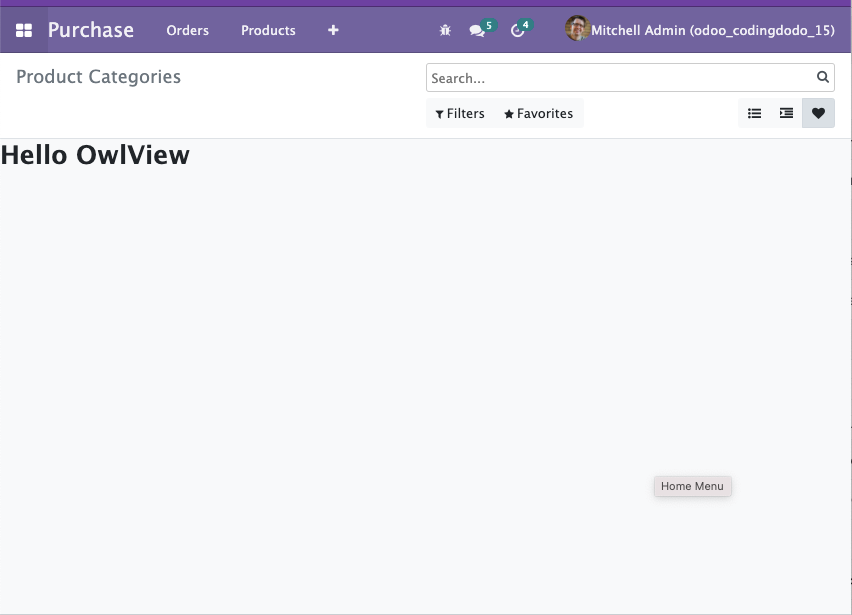
To create a simple View, that you can switch to from the UI is actually very simple. You can make a basic "Hello world" View with 6 lines of code:
/** @odoo-module **/
import { registry } from "@web/core/registry";
import { Layout } from "@web/views/layout";

// Empty component for now
class VeryBasicView extends owl.Component {}

VeryBasicView.type = "very_basic_view";
VeryBasicView.display_name = "VeryBasicView";
VeryBasicView.icon = "fa-heart";
VeryBasicView.multiRecord = true;
VeryBasicView.searchMenuTypes = ["filter", "favorite"];

// Registering the Layout Component is optional
// But in this example we use it in our template
VeryBasicView.components = { Layout };
VeryBasicView.template = owl.tags.xml/* xml */ `
<Layout viewType="'very_basic_view'">
    <div><h1>Hello OwlView</h1></div>
</Layout>`;

registry.category("views").add("very_basic_view", VeryBasicView);
Register the view in the ir_http.py file:
from odoo import fields, models


class View(models.Model):
    _inherit = "ir.ui.view"

    type = fields.Selection(
        selection_add=[("very_basic_view", "Very Basic View")]
    )
And add it to any model in an XML file. In this example, I added that view to the product categories:
<?xml version="1.0" encoding="utf-8"?>
<odoo>

    <record id="product_category_view_very_basic_view" model="ir.ui.view">
        <field name="name">Product Categories Very Basic View</field>
        <field name="model">product.category</field>
        <field name="arch" type="xml">
            <very_basic_view></very_basic_view>
        </field>
    </record>

    <record id='product.product_category_action_form' model='ir.actions.act_window'>
        <field name="name">Product Categories</field>
        <field name="res_model">product.category</field>
        <field name="view_mode">tree,very_basic_view,form</field>
    </record>

</odoo>
And you should see:
Now let's add a basic Model to our View
In the same file let's create a VeryBasicModel and call the useModel in the setup of our main View Component:
/** @odoo-module **/
import { registry } from "@web/core/registry";
import { Layout } from "@web/views/layout";
import { KeepLast } from "@web/core/utils/concurrency";
import { Model, useModel } from "@web/views/helpers/model";

class VeryBasicModel extends Model {
  static services = ["orm"];

  setup(params, { orm }) {
    this.model = params.resModel;
    this.orm = orm;
    this.keepLast = new KeepLast();
  }

  async load(params) {
    this.data = await this.keepLast.add(
      this.orm.searchRead(this.model, params.domain, [], { limit: 100 })
    );
    this.notify();
  }
}
VeryBasicModel.services = ["orm"];

class VeryBasicView extends owl.Component {
  setup() {
    this.model = useModel(VeryBasicModel, {
      resModel: this.props.resModel,
      domain: this.props.domain,
    });
  }
}

VeryBasicView.type = "very_basic_view";
VeryBasicView.display_name = "VeryBasicView";
VeryBasicView.icon = "fa-heart";
VeryBasicView.multiRecord = true;
VeryBasicView.searchMenuTypes = ["filter", "favorite"];
VeryBasicView.components = { Layout };
VeryBasicView.template = owl.tags.xml/* xml */ `
<Layout viewType="'very_basic_view'">
    <div><h1>Hello OwlView</h1></div>
    <div t-foreach="model.data" t-as="record" t-key="record.id">
        <t t-esc="record.name"/>
    </div>
</Layout>`;

registry.category("views").add("very_basic_view", VeryBasicView);
With that done, you already have a View fetching and displaying data:
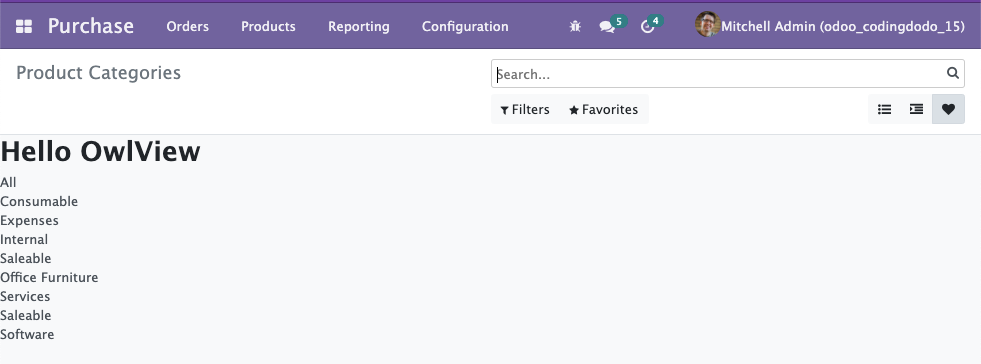
You don't really need a Renderer for such a basic display but if would want one, it will just be a sub-Component of the main "VeryBasicView" Component. You can pass the this.model that is holding data, directly to the Renderer Component and this Renderer will then react to any change in the Model.
Taking it further
For a more advanced use case with Renderer, bigger Model, and event catching, refer to the next part of this tutorial where we migrate our Odoo 14 OWL View to Odoo 15.
Conclusion
This article is meant to live for a long time. I will update it regularly as I find more and more knowledge fitted to be kept in this "Reference" guide.
The goal is to have "improve" documentation this time around because as of now the Odoo official Documentation is still lacking.
Thank you for reading! ?
If you liked the content, consider becoming a member as it is the best way to support me. Please follow CodingDodo on Twitter for the latest news and article previews.


