In this series, we will go over the basics of the Odoo JavaScript Framework with the end goal to create a view from scratch in OWL.
As of Odoo 14 (and still a big part of Odoo 15), the core JavaScript MVC system in Odoo has not been yet rewritten in OWL. So it is necessary for us to understand better each part so our development flow will be better later and we will be able to understand the different bugs and roadblocks that may arise.
We will look at the MVC Architecture of Odoo soon but first, we have to take a look at the two pillars of JavaScript classes that every piece is built upon the core 'web.Class' and the core 'web.Widget'.
The core web.Class of Odoo
The web.Class defined in odoo/addons/web/static/src/js/core/class.js is a very old piece of code (ES6 Classes were not here yet) in the Odoo JavaScript Framework that makes the whole system of inheritance possible. The web.Class is at the basis of most other classes in the Odoo JavaScript Framework, except for the OWL Components that are pure ES6 Classes.
It was inspired by this 2008 article by John Resig where he presents his solution to inheritance in JavaScript via a function prototype system.
I wanted to go about extracting the soul of these techniques [Prototype and base2] into a simple, re-usable, form that could be easily understood and didn’t have any dependencies. Additionally I wanted the result to be simple and highly usable
- John Resig
The John Resig version was a single inheritance system that Odoo improved to add support for mixins:
function OdooClass(){}

// defining the extend function
OdooClass.extend = function() {
    var _super = this.prototype;
    // Support mixins arguments
    var args = _.toArray(arguments);
    args.unshift({});
    var prop = _.extend.apply(_,args);
    // ...
    // rest of the definition
}
This makes it possible for Odoo to do things like:
var Class = require('web.Class');
var mixins = require('web.mixins');
var ServicesMixin = require('web.ServicesMixin');


var MyCustomClass = core.Class.extend(mixins.PropertiesMixin, ServicesMixin, {
    myProperty: 'test'
    // ...
}
Odoo also, unfortunately, added the new function include that modifies the prototype of the original "class". To simplify it, include is a dangerous function that will modify "in place" the behavior of a method way up into its parents, it was not in the original design but was a necessary evil in the Odoo "modular" ecosystem.
.extend() and .include on every Odoo JavaScript Widgets and so on.
The web.Widget Odoo Class.
The Widget Class extends the core web.Class and is tightly coupled with its DOM representation and JQuery.
var Widget = core.Class.extend(mixins.PropertiesMixin, ServicesMixin, {
    // Backbone-ish API
    tagName: 'div',
    id: null,
    className: null,
    attributes: {},
    events: {},
    // Rest of the class' properties and functions
}
By extending the core web.Class this Widget class can have 2 mixins, the PropertiesMixin and the ServicesMixin.
The web.Widget extends the PropertiesMixin
Let's take a quick look at these mixins, first, the PropertiesMixin is supposed to... handle properties ? but it also extends the EventDispatcherMixin ! This is what actually gives the web.Widget class the possibility to trigger events, etc...
And if you want to see something quite funny, inside the PropertiesMixin there is this beautiful piece of code with comments (I did not edit anything, that comment is still in source code of Odoo 14).
// seriously, why are you doing this? it is obviously a stupid design.
// the properties mixin should not be concerned with handling fields details.
// this also has the side effect of introducing a dependency on utils.  Todo:
// remove this, or move it elsewhere.  Also, learn OO programming.
if (key === 'value' && self.field && self.field.type === 'float' && tmp && val){
    var digits = self.field.digits;
    if (_.isArray(digits)) {
        if (utils.float_is_zero(tmp - val, digits[1])) {
            return;
        }
}I enjoy good old dev banter in the code, anyway the more interesting fact is the underlying extend to the EventDispatcherMixin giving, in the end, the ability to the web.Widget to have the trigger_up function and the various on, of, once events binding on the prototype.
The EventDispatcherMixin itself extends the ParentedMixin ! This mixin gives access to function like getParent and, getChildren, and, also handle the destroying of children when a parent is destroyed.
The web.Widget extends the ServicesMixin
This mixin gives the Widget abilities to loadViews, do_action, get_session, and make RPC calls via the _rpc function.
The funny part about, for example, the do_action (same with the get_session, loadViews, etc, except the _rpc) is what it does:
do_action: function (action, options) {
    var self = this;
    return new Promise(function (resolve, reject) {
        self.trigger_up('do_action', {
            action: action,
            options: options,
            on_success: resolve,
            on_fail: reject,
        });
    });
},
We can see that the do_action is just a shortcut to actually bubble up the event via a trigger_up...
But this mixin doesn't extend the EventDispatcherMixin ? and still depends on the fact that a trigger_up function should be present! So in reality you cannot use all the functions of this ServicesMixin without also pulling the EventsDispatcherMixin into your class.
Anyway, I will stop here because you get the idea, this is not the best architectural work done out there.
Let's recap this mixins mess, so what can the web.Widget do ?
To make a summary of the inheritance tree, the web.Widget has access to:
- The ParentedMixin for
getChildren,getParent, etc - The EventDispatcherMixin to handle events and
trigger_up - The PropertiesMixin to
getandset - The ServicesMixin to make RPC calls, call actions, load views, etc.
The actual content of the web.Widget class
Besides what it extends, the web.Widget main purpose is to render itself with QWeb, do its life cycle management (destroy when parents are destroyed or destroying children when it is destroyed), and inserting itself into the DOM.
The web.Widget has Backbone inspired properties visible in the class like tagName, id, className, attributes, events, and template that we saw earlier but also other properties that will get filled by the modular nature of Odoo.
The xmlDependencies, cssLibs, jsLibs and assetLibs that are lists of files, paths, xml_id to fetch before the Widget can be rendered (It will not load anything that hasn't already been loaded).
The web.Widget class also has 2 hidden properties that get filled during its lifecycle:
elis DOM Element set when calling thesetElementfunction, called for example when the Widget is attached to the DOM via theattachTofunction.$elis the JQuery version of that element
this.$el or this.el at the wrong time of the Widget lifecycle you will probably see undefined when debugging! These 2 properties are only present after a call to the function renderElement or an attachTo.
Rendering itself with QWeb
The widget renders itself with its renderElement function:
renderElement: function () {
    var $el;
    if (this.template) {
        $el = $(core.qweb.render(this.template, {widget: this}).trim());
    } else {
        $el = this._makeDescriptive();
    }
    this._replaceElement($el);
},
Lifecycle
The Life cycle goes init -> willStart ->[rendering]-> start -> destroy. In the init, the parent and children are set, the willStart will do asynchronous work to load XML Views or Libs, rendering will happen by a call via other parts of the Framework, start will be different for each implementation and destroy will remove the $el from the DOM and clean up the children.
Inserting itself into the DOM
To insert the widget to the DOM, the Widget gives us access to public functions like appendTo, attachTo, insertAfter, insertBefore, and prependTo that all takes a jQuery element as an argument and do the work corresponding to their name.
Conclusion
That's it for the core classes of the Framework, the web.Widget is one of the most important pieces of the Framework, I would advise you to take time to dive into the source code, read again our explanation and take a look at the updated Odoo documentation about the web.Widget class.
The Odoo JavaScript MVC overview
Now we will begin to talk about the JavaScript MVC architecture. I know that some of you may feel uncomfortable about having an MVC here, as maybe you would think that the WebClient in JavaScript is already the View where Python has the real M and C. But you should think about the WebClient as a separate single-page application that also needs its own MVC architecture.
The way Odoo implements MVC (Model View Controller) in its JavaScript client is heavily inspired by Backbone.js, but still different enough that it deserves its own Tutorial.
The MVC base Classes
We begin our analysis of the MVC Architecture in Odoo WebClient by going into the source code inside /odoo/addons/web/static/src/core/mvc.js.
This file defines the main 4 components of the Odoo vision of MVC; The Model, the Renderer, the Controller, and the Factory (Also known as the "View").
This is a quick overview of the mvc.js file for us to know what kind of classes these 4 elements are.
var Class = require('web.Class');
var mixins = require('web.mixins');
var ServicesMixin = require('web.ServicesMixin');
var Widget = require('web.Widget');

var Model = Class.extend(mixins.EventDispatcherMixin, ServicesMixin, {
	//...
})
var Renderer = Widget.extend({
    //...
})
var Controller = Widget.extend({
    //...
})
var Factory = Class.extend({
    config: {
        Model: Model,
        Renderer: Renderer,
        Controller: Controller,
    },
    //...
})
The Model controls the state, it will call the server via RPC to fetch data, update it, and create it. The Model doesn't extend the Widget class but the base core.web.Class, has no view representation and is only responsible for the state of the data.
The Renderer is extending the Widget Class and its sole responsibility is to display something to the end-user via rendering things to the DOM. It doesn't have direct access to the Model, it renders itself by order of the Controller, and should be able to capture events, like click, to dispatch them to the Controller.
The Controller is the coordinator between the Renderer and the Model. The Controller also receives events from other elements like the search bar or the pagination and should be able to update itself (and trigger an update to the Renderer also). The Controller owns the Model and the Renderer.
The Factory (or View) inits all the other Components with the correct parameters that it gets from the route URL. The Factory's main job is to instantiate the Controller with the Model and the Renderer passed as params. As soon as the Controller is started the Factory has no use anymore.
The Abstract classes of the MVC Architecture
The implementation we just saw inside this mvc.js file of the 4 components is very minimal. The whole file clocks at 250 lines so it will not be very productive to analyze them.
The actual basis of MVC in Odoo is separated into 4 files that extend these 4 mvc components. They can be found inside addons/web/static/src/js/views root folder:
- AbstractModel (abstractmodel.js)
- AbstractRenderer (abstractrenderer.js)
- AbstractController (abstractcontroller.js)
- AbstractView (abstractview.js)
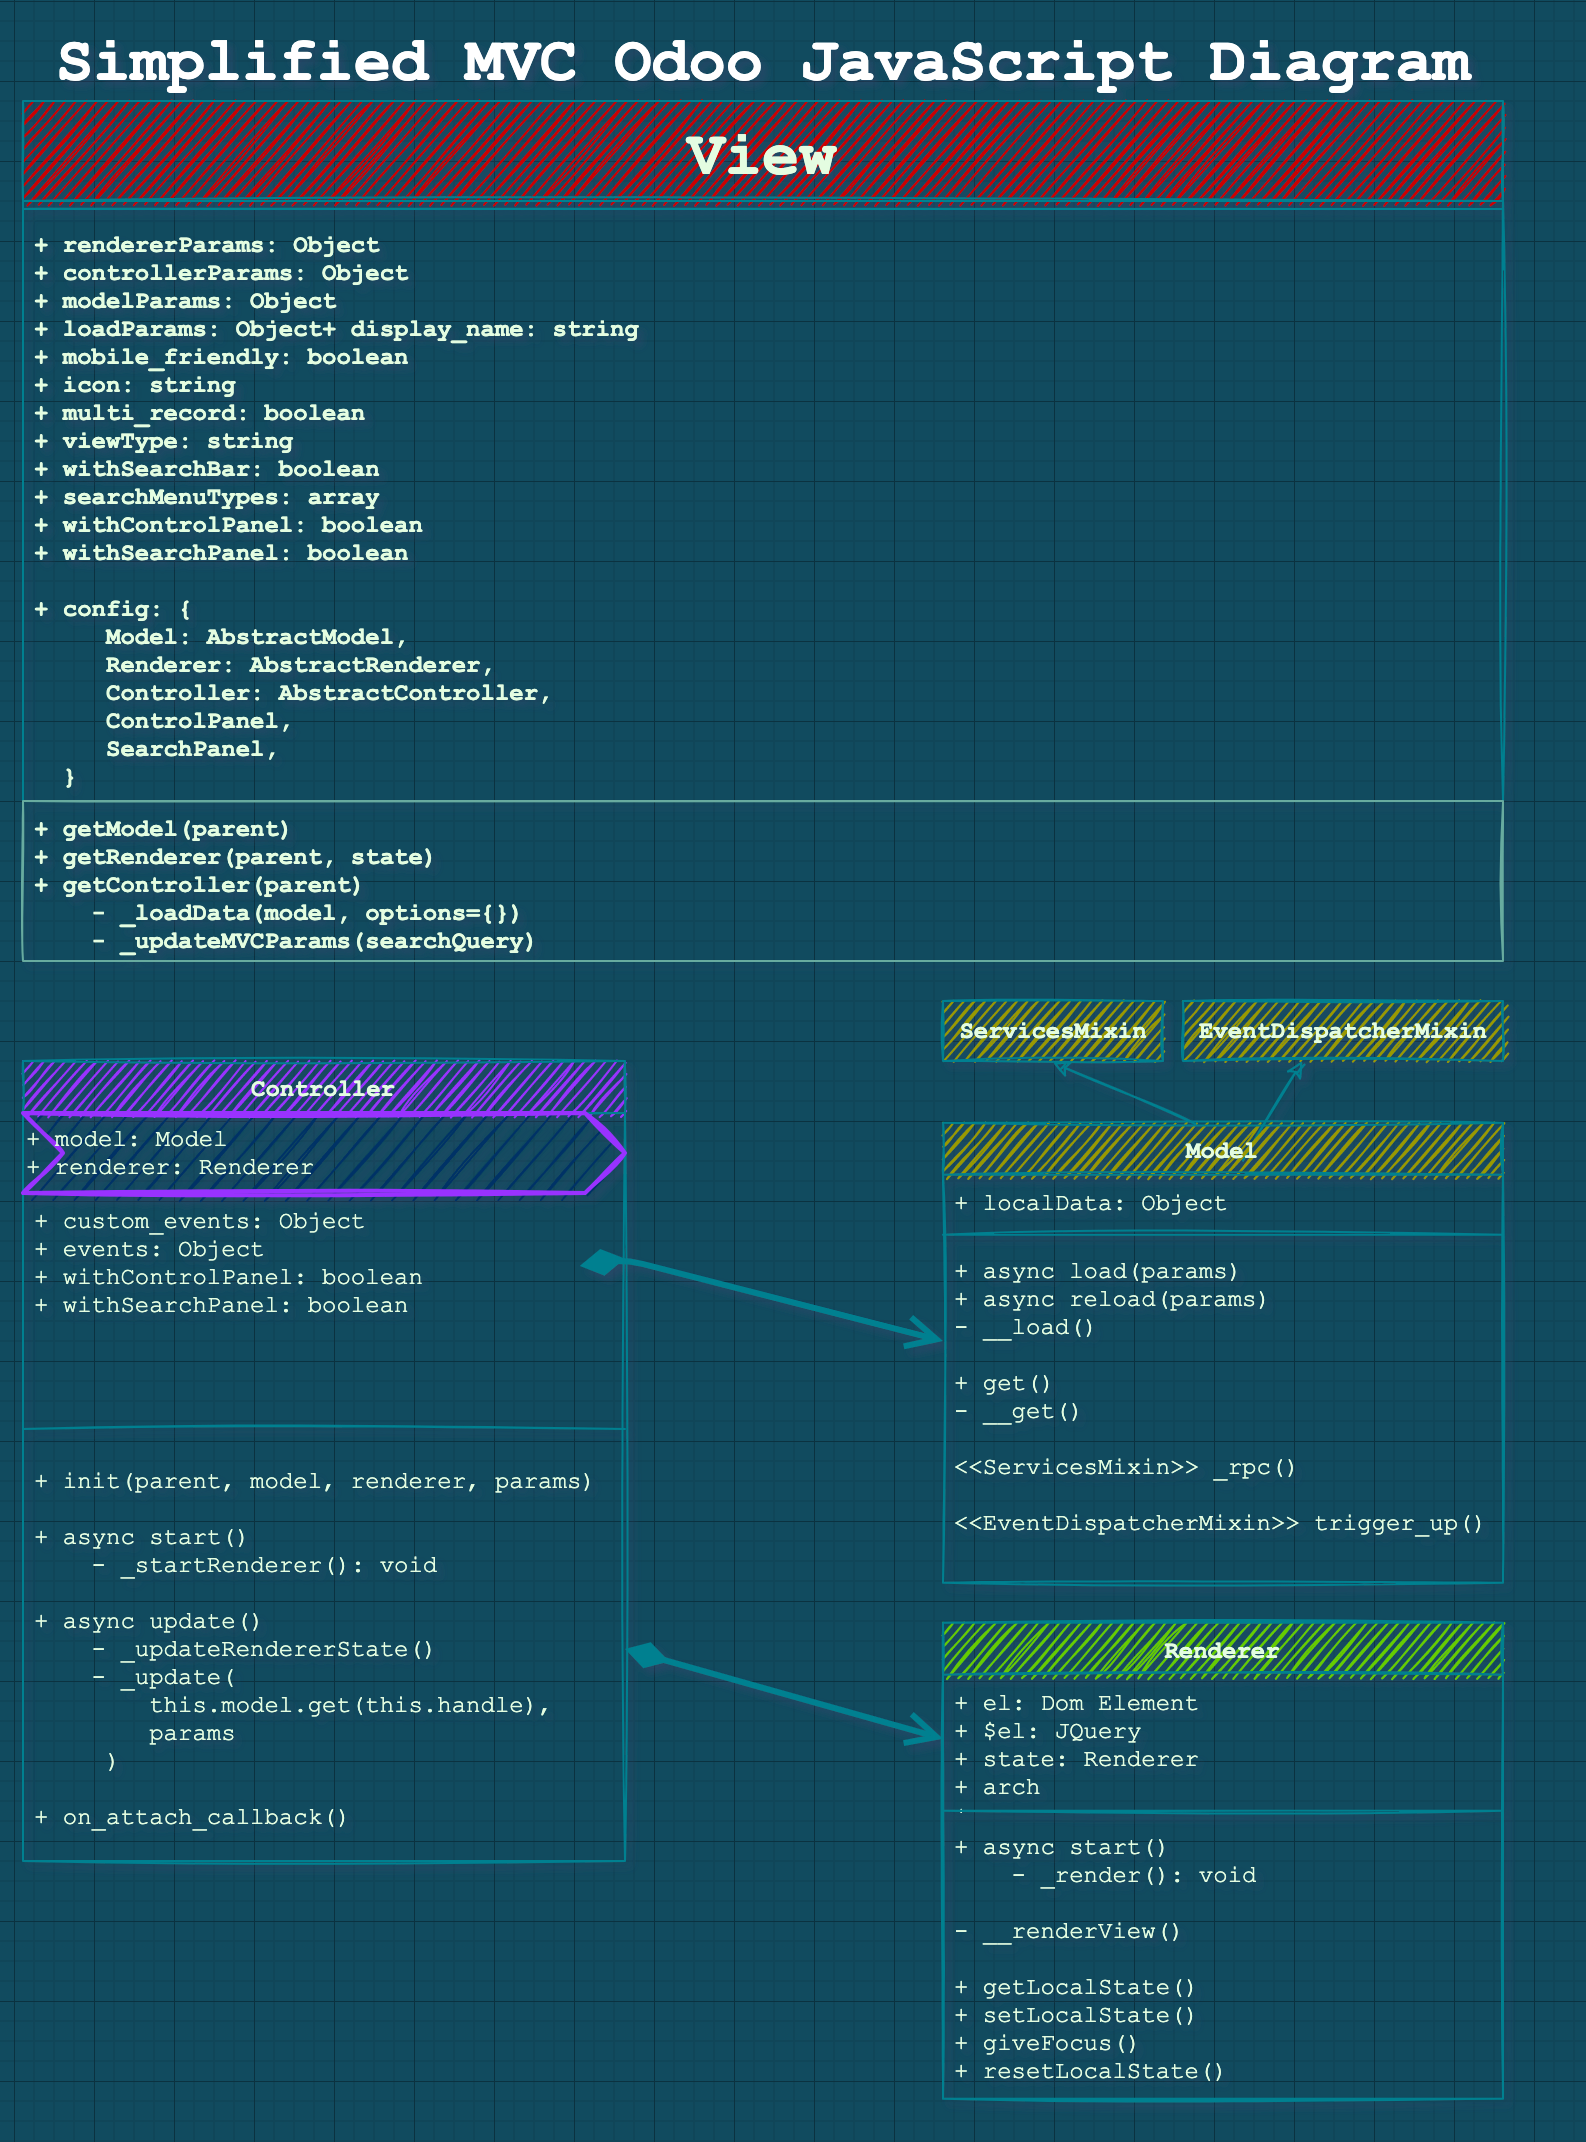
To really understand what each of the MVC components do we will look at these files one by one. I will call them Model instead of AbstractModel, Renderer instead of AbstractRenderer, etc... so it will be easier to follow. Because knowing how they works will be sufficient enough for us in the objective of creating OWL Views.
The Model
The Model holds the state of the application and will directly talk to the server by making RPC calls to fetch data and process the result.
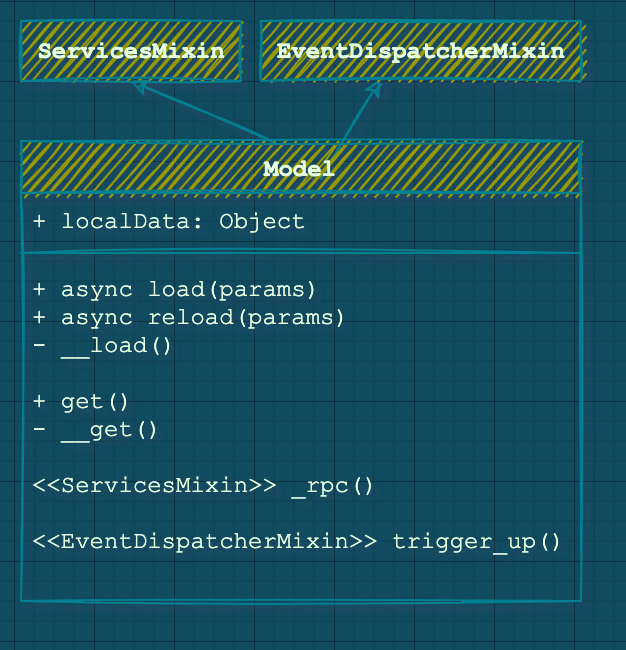
Basic functions of the Model Class load, reload and, get.
A Model has no UI implementation yet but, should answer to actions changed, initialization, etc. With 3 mains functions that you should be aware of:
The async load function.
This method is called at the initialization of the view and will be called only once. The actual function is not very interesting, it is an override to handle the case of empty records and the need to load «sample data».
We will not focus on "sample data" in this tutorial, but you have to know that some logic pieces inside these files are entirely dedicated to handling sample data.
async load(params) {
    this.loadParams = params;
    const handle = await this.__load(...arguments);
    await this._callSampleModel('__load', handle, ...arguments);
    return handle;
},
The params arg will contain:
- Info related to the fields and their types
- For example in the BasicModel: The type of the view, «list» for TreeViews, and «record» for FormViews
- For example in the BasicModel: The recordID, if on a single record view
The async reload function.
async reload(_, params) {
    const handle = await this.__reload(...arguments);
    if (this._isInSampleMode) {
        if (!this._haveParamsChanged(params)) {
            await this._callSampleModel('__reload', handle, ...arguments);
        } else {
            this.leaveSampleMode();
        }
    }
    return handle;
},
Very similar to the load function, the reload function is called when something in the UI changed and the data need to be refreshed. Typically, this function is called when you are in FormView mode and click on the arrows to go to the next/previous records or when you refresh.
Example with the BasicModel (used in Form/List Views)
BasicModel extends AbstractModel and is a real implementation of the abstract class, to make what we said earlier a bit more clear we will take a look at this example.
In «real» implementation like the BasicModel, the reload and loadfunction both end up calling another underlying function called __load(with 2 underscores) that does the actual data fetching and filling up info on the Class.
The underlying __load in BasicModel implementation
The actual heavy lifting is done in the __load function that will handle all the logic. For example, in the BasicModel (which extends the AbstractModel), the load is overridden to handle the cases of a «list» view type or a «record» view type.
It will create a local dataPoint object containing all the info via the _makeDataPoint function (this adds the data and other meta info like the name of the model, the offset, the "orderBy", etc.).
From this __load function, another _load (with 1 underscore this time !) will make the actual RPC Calls to the server.
At the exit of the function, the promise eventually resolves to an ID.
The get function for the data that will be rendered.
This get function will be called by the Controller and the result will be passed to the Renderer. This function will format data similarly to the dataPoint seen previously. Actually, the get function often calls an underlying __get function (like in the BasicModel) that is used across the Model inside the «makeDataPoint» function.
In the AbstractModel this function just return an empty Object but in the BasicModel this is what is returned to the Controller:
var record = {
    context: _.extend({}, element.context),
    count: element.count,
    data: data, // Contains the actual data and field values
    domain: element.domain.slice(0),
    evalModifiers: element.evalModifiers,
    fields: element.fields,
    fieldsInfo: element.fieldsInfo,
    getContext: element.getContext,
    getDomain: element.getDomain,
    getFieldNames: element.getFieldNames,
    id: element.id,
    isDirty: element.isDirty,
    limit: element.limit,
    model: element.model,
    offset: element.offset,
    ref: element.ref,
    res_ids: element.res_ids.slice(0),
    specialData: _.extend({}, element.specialData),
    type: 'record',
    viewType: element.viewType,
};
Notice the type property, with the BasicModel it will change between record for FormViews and list for ListViews (trees). This is the main condition checked in the BasicModel to handle the queries and type of results expected (list of ids or actual record).
The Renderer
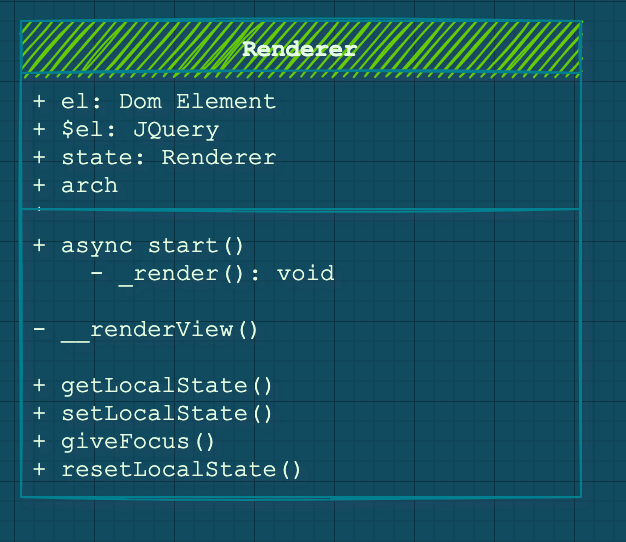
The Renderer is the equivalent of BackBone «Views» but was named differently, it is responsible for displaying the user interface, and react to user changes. In Odoo 14 you can have a « legacy » MVC Renderer that extends the AbstractRender, or you can create an OWL Renderer. The two are very different and don’t really have the same Interface or functionalities.
Legacy Renderer overview
We will not go too deep on the Legacy AbstractRenderer because our focus is on OWL for this lesson but we will have a quick overview.
The Legacy Renderer has the main function: _render that itself calls the underlying _renderView containing the logic of creating the UI.
This _render function is called in the async start method when the Renderer is attached and started by the Controller. It is also called each time the Controller requires a change of the state of the UI (like a pagination action, a refresh, next page, etc.) inside the async updateStatefunction.
When the Controller wants to update, the Renderer will set and give back his state with getLocalState and setLocalState. Before being detached the Renderer also has to reset its state via the resetLocalStatefunction to cleanup memory usage.
The OWL Renderer
The OwlRendererWrapper helps the Component answer to the standard interactions the Controller has with Renderer as we saw before with the Legacy version. For that matter the RendererWrapper exposes accessible functions that return nothing, just to not throw an error.
class RendererWrapper extends ComponentWrapper {
    getLocalState() { }
    setLocalState() { }
    giveFocus() { }
    resetLocalState() { }
}
These functions do nothing, they are here for the legacy code not to break. You need to override them yourself in the case of OWL Renderer. For example, the PivotRenderer actually overrides the resetLocalState to actually reset the OWL state of the Component:
_resetState() {
    // This check is used to avoid the destruction of the dropdown.
    // The click on the header bubbles to window in order to hide
    // all the other dropdowns (in this component or other components).
    // So we need isHeaderClicked to cancel this behaviour.
    if (this.isHeaderClicked) {
        this.isHeaderClicked = false;
        return;
    }
    this.state.activeNodeHeader = {
        groupId: false,
        isXAxis: false,
        click: false
    };
}
It may be necessary to keep these functions in mind when your OWL Renderer begins to have more functionalities.
The Controller
The Controller generally manages the communication between the Renderer and the Model. But it is also responsible for answering events from the ControlPanel or the SearchPanel.
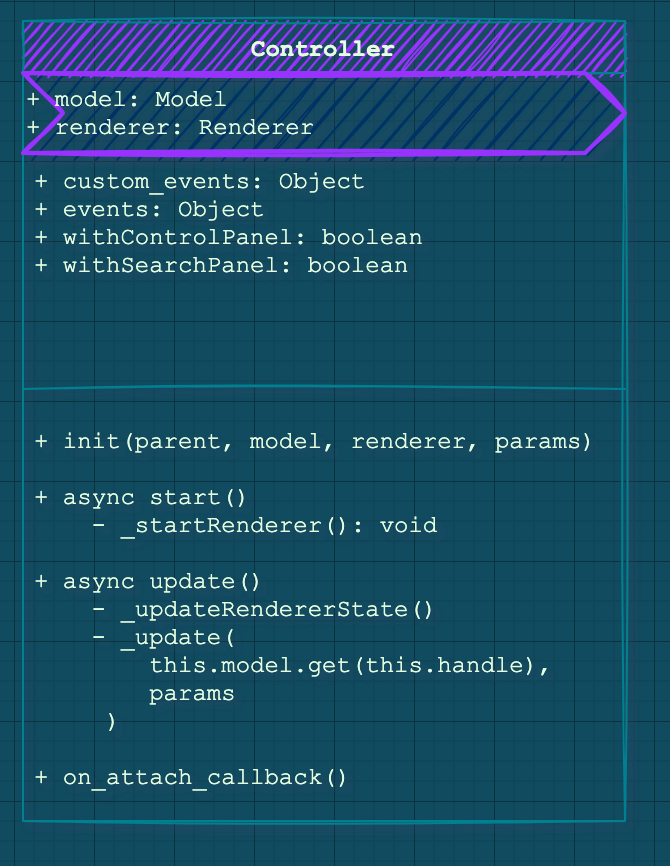
At initialization, The Controller will store the Model and Renderer as properties to themselves. And, in its start method, it will attach the renderer to the $el property, corresponding to the root JQuery node.
The start function is interesting because it will insert the Renderer into the DOM. In case you have an OWL Renderer there is a special condition that handles that in the AbstractController base Class.
_startRenderer: function () {
    if (this.renderer instanceof owl.Component) {
        return this.renderer.mount(this.$('.o_content')[0]);
    }
    return this.renderer.appendTo(this.$('.o_content'));
},
Now we will go over the two main responsibilities of the Controller.
Communication between the Renderer and the Model
The Renderer (UI) will fire some Events to the Controller and in response, the former will execute some actions.
With the help of the ActionsMixin the Controller can register some custom_events that the Controller will listen to and bind function as handler/
custom_events: _.extend({}, ActionMixin.custom_events, {
    navigation_move: '_onNavigationMove',
    open_record: '_onOpenRecord',
    switch_view: '_onSwitchView',
}),
The Controller will also answer to main UI buttons events, like changing a Page, and will call its update function to triggering call to the Model function:
/**
 * This is the main entry point for the controller.  Changes from the search
 * view arrive in this method, and internal changes can sometimes also call
 * this method.  It is basically the way everything notifies the controller
 * that something has changed.
 *
 * The update method is responsible for fetching necessary data, then
 * updating the renderer and wait for the rendering to complete.
 *
 * @param {Object} params will be given to the model and to the renderer
 * @param {Object} [options={}]
 * @param {boolean} [options.reload=true] if true, the model will reload data
 * @returns {Promise}
 */
async update(params, options = {}) {
    const shouldReload = 'reload' in options ? options.reload : true;
    if (shouldReload) {
        this.handle = await this.dp.add(this.model.reload(this.handle, params));
    }
    const localState = this.renderer.getLocalState();
    const state = this.model.get(this.handle, { withSampleData: true });
    const promises = [
        this._updateRendererState(state, params).then(() => {
            this.renderer.setLocalState(localState);
        }),
        this._update(this.model.get(this.handle), params)
    ];
    await this.dp.add(Promise.all(promises));
    this.updateButtons();
    this.el.classList.toggle('o_view_sample_data', this.model.isInSampleMode());
},
Access to the Control Panel and Search Panel
The Controller should also be configured to know if it will interact with a ControlPanel and a SearchBar via the withControlPanel, and withSearchPanel properties.
Note that the SearchPanel and the ControlPonel are now OWL Components in v14 now and are instantiated inside the start function of the Controller by wrapping them around with the ComponentWrapper:
if (this.withControlPanel) {
    this._updateControlPanelProps(this.initialState);
    this._controlPanelWrapper = new ComponentWrapper(this, this.ControlPanel, this.controlPanelProps);
    this._controlPanelWrapper.env.bus.on('focus-view', this, () => this._giveFocus());
    promises.push(this._controlPanelWrapper.mount(this.el, { position: 'first-child' }));
}
if (this.withSearchPanel) {
    this._searchPanelWrapper = new ComponentWrapper(this, this.SearchPanel, this.searchPanelProps);
    const content = this.el.querySelector(':scope .o_content');
    content.classList.add('o_controller_with_searchpanel');
    promises.push(this._searchPanelWrapper.mount(content, { position: 'first-child' }));
}
The update function of a Controller also has to update the SearchPanel or the ControlPanel if they are part of it via the _updateSearchPanel and _updateControlPanelProps respectively.
OWL specifics inside the Controller
Some functions in the AbstractController are specific to the case that interests us here. We will make an OWL Renderer Component and the API is not quite the same when the Renderer has to answer, for example when the Controller is attached or detached to the DOM. Example with the attach:
on_attach_callback: function () {
    ActionMixin.on_attach_callback.call(this);
    this.searchModel.on('search', this, this._onSearch);
    this.searchModel.trigger('focus-control-panel');
    if (this.withControlPanel) {
        this.searchModel.on('get-controller-query-params', this, this._onGetOwnedQueryParams);
    }
    if (!(this.renderer instanceof owl.Component)) {
        this.renderer.on_attach_callback();
    }
},
One other part that is specific to OWL Renderers is when the State has to be updated, this function is called by the update function that we saw just before.
_updateRendererState(state, params = {}) {
    if (this.renderer instanceof owl.Component) {
        return this.renderer.update(state);
    }
    return this.renderer.updateState(state, params);
},
Keep that in mind, it will help you debug later when you see weird behavior with your OWL Renderer Component!
The View
The View in Odoo JavaScript is not really the "V"iew from MVC. It is inherited from the "Factory" MVC Class seen earlier. I think the term "Factory" is a better fit for it because its main role is to instantiate each of the 3 elements we saw before.
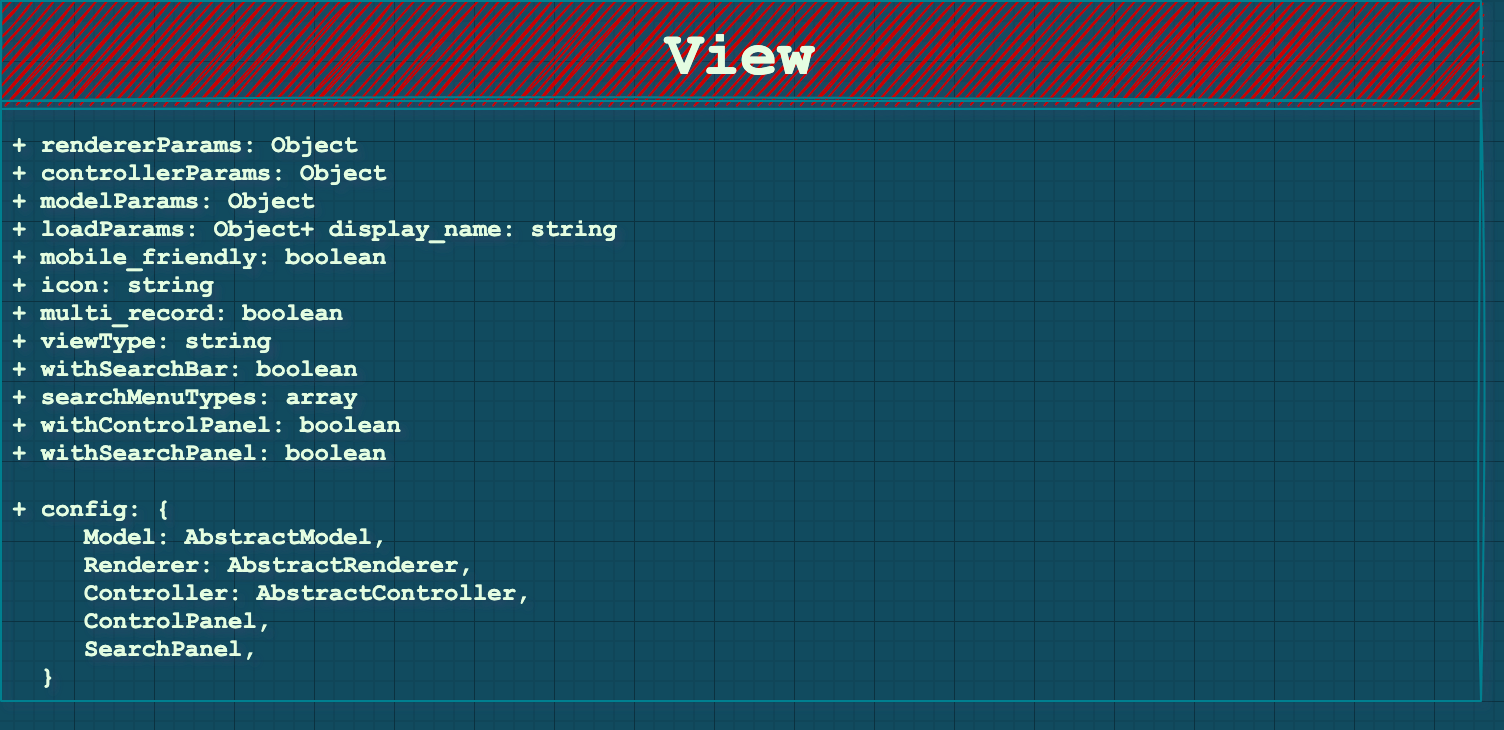
A View initialization takes 2 parameters:
init: function (viewInfo, params) {
    //...
}
The main goal of initialization is to fill config objects that will be passed to sub-components to create them:
this.rendererParams = {};
this.controllerParams = {};
this.modelParams = {};
this.loadParams = {};
The first three have obvious targets, respectively for the Renderer, the Controller and, the Model.
The loadParams will be used to load the initial data with _loadData and it will contain info if the View is being "opened" with a default group-by, the context, the limit, or the default domain.Let's see how these config objects are filled via analyzing the two parameters of the init function, "viewInfo" and "params". The goal for us is to understand how is our real JS View is created and started from the XML we usually write in our day-to-day Odoo developer life.
Analyzing the viewInfo parameter
The viewInfo first contains the arch which is a string representation of the XML arch of the defined view (in your XML file). This arch will be parsed in the init function and returned as JS Object. The viewInfo also contains the fields present in the Original XML and their different attributes.
// Inside the init function, parsing of the viewInfo to extract
// Arch and fields
if (typeof viewInfo.arch === 'string') {
    this.fieldsView = this._processFieldsView(viewInfo);
} else {
    this.fieldsView = viewInfo;
}
// Storing arch and fields as properties of the view
this.arch = this.fieldsView.arch;
this.fields = this.fieldsView.viewFields;
The arch data passed to the Render and the Controller
The local arch will then be passed to the Renderer, for the actual rendering of the UI via a rendererParams config object:
this.rendererParams = {
    arch: this.arch,
    isEmbedded: isEmbedded,
    noContentHelp: htmlHelp.innerText.trim() ? help : "",
};
The arch also contains info about the edit/create/delete/duplicate possible actions that will be passed to the Controller.
The fields data passed to the Model
The this.fields will be passed, similarly to the Renderer, via a config object to the Model:
this.modelParams = {
    fields: this.fields,
    modelName: params.modelName,
    useSampleModel,
};
The Model, in charge of communicating with the server, will be able to fetch the record(s) with the right field.
What's in the params of the View init function?
The params is a big object containing all the necessary info for a good instantiation of our View, especially the Model and Controller part. The Renderer doesn't need anything from the params.
Firstly, it holds the modelName, this will be passed to the modelParams and the loadParams we saw in the intro.
The params also contains the action we are coming from. This action will be parsed and from that, an object will be created:
_extractParamsFromAction: function (action) {
    action = action || {};
    var context = action.context || {};
    var inline = action.target === 'inline';
    const params = {
        actionId: action.id || false,
        actionViews: action.views || [],
        activateDefaultFavorite: !context.active_id && !context.active_ids,
        context: action.context || {},
        controlPanelFieldsView: action.controlPanelFieldsView,
        currentId: action.res_id ? action.res_id : undefined,  // load returns 0
        displayName: action.display_name || action.name,
        domain: action.domain || [],
        limit: action.limit,
        modelName: action.res_model,
        noContentHelp: action.help,
        searchMenuTypes: inline ? [] : this.searchMenuTypes,
        withBreadcrumbs: 'no_breadcrumbs' in context ? !context.no_breadcrumbs : true,
        withControlPanel: this.withControlPanel,
        withSearchBar: inline ? false : this.withSearchBar,
        withSearchPanel: this.withSearchPanel,
    };
    if ('useSampleModel' in action) {
        params.useSampleModel = action.useSampleModel;
    }
    return params;
},
We can notably see that the context is here, the domain, limit and, modelName.
The params actionView, controllerId, displayName and modelName will be passed to the Controller via its config object.
The params count, context, domain, modelName, ids will be passed to the config object loadParams to load initial data.
The params modelName will also be passed to the Model via its config object, for natural reasons.
Recap of the View initialization
A quick overview of what we just detailed:
The View instantiation uses the params (coming from the action) and the arch (coming from the XML) to put critical data into config objects necessary for the creation of the Model, Renderer, and the Controller.
-
The
paramshaving the modelName, context, etc..., holds necessary info for the Model, Controller and the initial loading of the data. -
The
archcontains conditions for edit/create/delete/duplicate passed to the Controller. It also contains the fields for the Model and, the arch XML will be passed to the Renderer also.
What does the View do after init?
getController function and be done. The Controller will take charge of the rest.
The window action manager will create a new View then call the getController function to "attach" it to the current action.
var view = new viewDescr.Widget(viewDescr.fieldsView, viewOptions);
var def = new Promise(function (resolve, reject) {
    rejection = reject;
    view.getController(self).then(function (widget) {
        if (def.rejected) {
            // the promise has been rejected meanwhile, meaning that
            // the action has been removed, so simply destroy the widget
            widget.destroy();
        } else {
            controller.widget = widget;
            resolve(controller);
        }
    }).guardedCatch(reject);
});
The View Object also has a getModel and a getRenderer functions, but they are used only inside the final getController.
The very abstract definition of this function is this one:
getController: function (parent) {
    var self = this;
    var model = this.getModel(parent);
    return Promise.all([this._loadData(model), ajax.loadLibs(this)]).then(function (result) {
        const { state, handle } = result[0];
        var renderer = self.getRenderer(parent, state);
        var Controller = self.Controller || self.config.Controller;
        const initialState = model.get(handle);
        var controllerParams = _.extend({
            initialState,
            handle,
        }, self.controllerParams);
        var controller = new Controller(parent, model, renderer, controllerParams);
        model.setParent(controller);
        renderer.setParent(controller);
        return controller;
    });
},
As we said earlier the main objective of the View is to Instantiate the Controller with the Model and Renderer as sub-widgets. After that, the View has no further utility and can be forgotten. The Controller will handle the rest of the updates coming from the UI until an action change occurs and a new View has to be created.
Making the View use an OWL Renderer
In the case you are creating an OWL Renderer you will need to wrap it around the RendererWrapper we saw earlier (existing especially for OWL Renderer) and return it inside the controller.
To do so we will override the getRenderer function like this example, inside our custom View definition:
const CustomOWLDisplayView = AbstractView.extend({
  accesskey: "m",
  display_name: _lt("CustomOWLDisplay"),
  icon: "fa-truck",
  config: _.extend({}, AbstractView.prototype.config, {
    Controller: CustomOWLDisplayController,
    Model: CustomOWLDisplayModel,
    Renderer: CustomOWLDisplayRenderer,
  }),
  viewType: "blog_publication",
  searchMenuTypes: ["filter", "favorite"],

  /**
   * @override
   */
  init: function () {
    this._super.apply(this, arguments);
  },
  /**
   *
   * @override
   */
  getRenderer(parent, state) {
    state = Object.assign(
      {},
      { data: state, rendererParams: this.rendererParams }
    );
    return new RendererWrapper(null, this.config.Renderer, state);
  },
});
Conclusion
That was quite long! This is an example "life-cycle" of JavaScript MVC in Odoo:
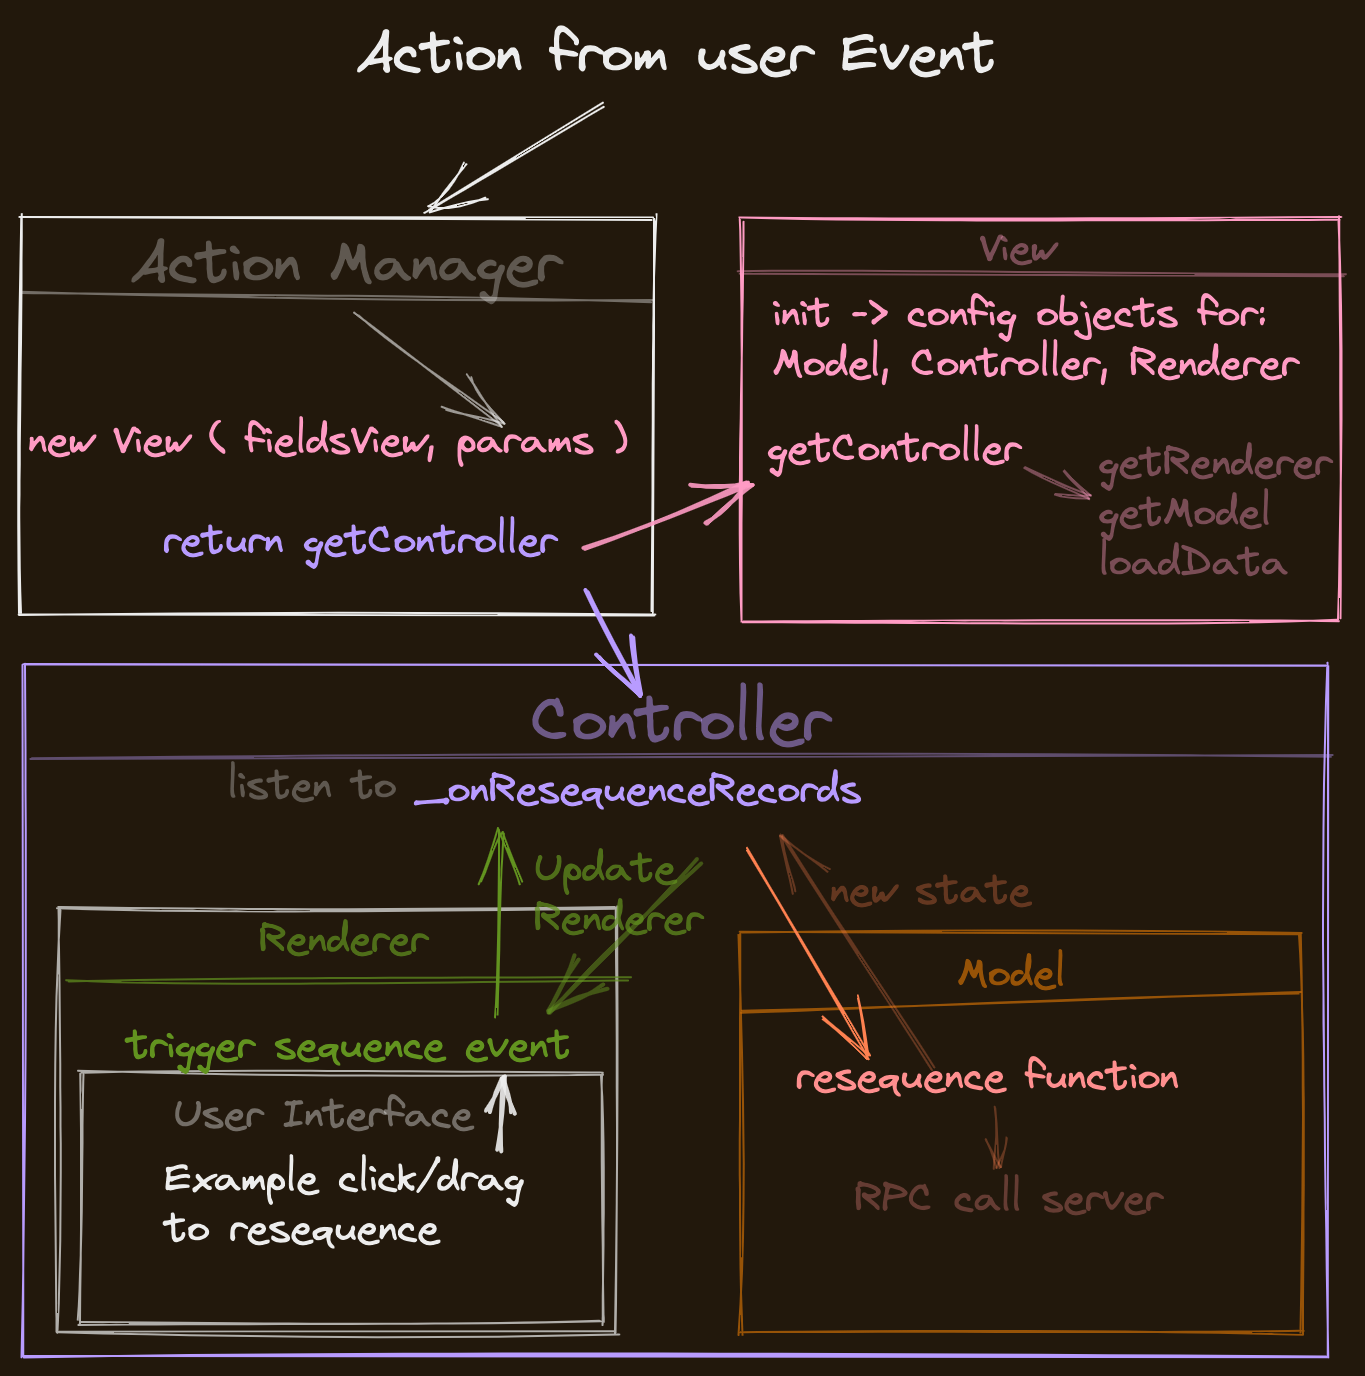
Feel free to experiment now with creating new views or wait until the next par where we will create an OWL view from scratch extending all the Abstract MVC Components.
If you found this article helpful, or not, I would love to hear your feedback either way so feel free to follow me on Twitter and consider subscribing to CodingDodo!


